

To optimize your photo editing in lightroom, follow these tips. Improve your photo editing skills in lightroom with these simple and effective tips.
By implementing these techniques, you can enhance the quality of your images and bring out their full potential. Whether you’re a beginner or an experienced photographer, these tips will help you take your editing to the next level. From adjusting exposure and color settings to using presets and making selective edits, lightroom offers a range of tools and features to make your photos stand out.
So, let’s explore some of the best photo editing tips in lightroom and unlock the true beauty of your images.
Credit: acphoto.pics
A. Brief Overview Of Adobe Lightroom’S Capabilities
With its powerful features and user-friendly interface, adobe lightroom has become one of the most popular photo editing tools among photographers and hobbyists alike. From organizing and managing your photo library to enhancing and transforming your images, lightroom offers a wide range of capabilities that allow you to take your photography to the next level.
In this section, we will explore some of the key functionalities that make lightroom a must-have software for any photographer.
Organize Your Photos With Ease
- Lightroom provides a seamless workflow for organizing your photos, ensuring that you can find the images you need quickly and efficiently. Whether you’re dealing with a large collection of images or a small set of pictures, lightroom allows you to easily import, sort, and categorize your photos, making it easy to locate them whenever you want.
- With lightroom’s powerful keywording and metadata tools, you can add relevant tags, descriptions, and copyright information to your images, making it easier to search for specific photos in the future. This level of organization not only saves you time but also helps you maintain a well-managed and easily accessible photo library.
Edit And Enhance Your Photos Effortlessly
- Lightroom’s editing capabilities are second to none, providing a wide range of tools and adjustments to help you achieve the desired look for your photos. From basic adjustments like exposure, contrast, and white balance to advanced techniques like selective adjustments and color grading, lightroom offers a comprehensive set of features that cater to both beginners and seasoned professionals.
- The non-destructive editing in lightroom allows you to experiment with different settings and revert back to the original image at any time. This flexibility gives you the freedom to explore different editing styles and techniques without the fear of permanently altering your original photo.
Create Stunning Presets And Apply Them With A Single Click
- Lightroom’s presets are a game-changer when it comes to streamlining your editing process. Presets allow you to save and apply specific sets of adjustments to your photos with just a click, saving you valuable time and effort.
- Whether you’re looking to achieve a specific aesthetic or maintain a consistent look across a series of images, presets provide a quick and efficient way to apply your desired edits instantly. Lightroom also offers a vast library of downloadable presets created by professional photographers, giving you even more options to enhance your photos with ease.
Share And Showcase Your Work Seamlessly
- Lightroom’s integration with various online platforms and social media networks makes it effortless to share your work with the world. With just a few clicks, you can publish your photos directly to popular websites like instagram, facebook, and flickr, allowing you to showcase your talent and reach a wider audience.
- Lightroom’s built-in web galleries enable you to create stunning online portfolios, making it easy to present your work to potential clients or showcase your photography skills to the world. With customizable templates and intuitive controls, you can create a personalized gallery that reflects your unique style and vision.
Adobe lightroom offers a plethora of capabilities that empower photographers to efficiently organize, edit, and showcase their photos. From organizing your photo library to enhancing the look of your images, lightroom provides a comprehensive set of tools and features that cater to the varied needs of photographers.
Whether you’re a professional or an enthusiast, lightroom is a valuable asset that can elevate your photography to new heights.
Ii. Getting Started With Lightroom
Are you ready to take your photo editing skills to the next level? Look no further than adobe lightroom, the industry-leading software for photographers and enthusiasts alike. In this section, we will dive into the essentials of getting started with lightroom, from installing the software to organizing and editing your images.
Installing Lightroom
Before you can begin your photo editing journey with lightroom, you’ll need to install the software on your computer. Here are the key points to keep in mind:
- Visit the adobe website and choose the subscription plan that suits your needs.
- Follow the prompts to download and install lightroom on your computer.
- Once installed, launch the program and sign in with your adobe id to access all its features.
Importing And Organizing Photos
Now that lightroom is up and running, it’s time to bring your photos into the software and organize them efficiently. Consider the following steps:
- Connect your camera or memory card to your computer and import your photos into lightroom.
- Take advantage of lightroom’s powerful organizational capabilities by creating folders and collections to keep your photos organized.
- Utilize keywords, star ratings, and flags to quickly find specific photos or identify your best shots.
Understanding The Lightroom Interface
Familiarizing yourself with the lightroom interface is crucial to make the most out of the software. Here’s what you need to know:
- Explore the library module to view and organize your photos.
- Switch to the develop module to start making adjustments and enhancements to your images.
- Experiment with the various panels, sliders, and tools to achieve the desired look for your photos.
Editing Basics
Once you have a good grasp of the lightroom interface, it’s time to dive into the editing process. Consider these essential techniques:
- Adjust the exposure, contrast, and white balance to ensure a well-balanced image.
- Enhance the colors of your photos using the vibrance and saturation sliders.
- Use the cropping and straightening tools to improve the composition of your shots.
Saving And Exporting Your Edited Photos
After putting in the effort to edit your photos, it’s crucial to save and export them properly. Follow these steps:
- Save your edits as a lightroom catalog to preserve all the adjustments you’ve made.
- When exporting your photos, choose the appropriate file format and quality settings for your intended use, whether it’s for web sharing or printing.
Congratulations! You’ve now covered the essential steps to get started with lightroom. In the upcoming sections of this blog post, we will delve deeper into specific editing techniques and tips to help you elevate your photo editing skills. Stay tuned for more exciting insights!
A. Understanding The Lightroom Interface
Are you new to lightroom and feeling a bit overwhelmed by its interface? Don’t worry, we’ve got you covered! In this section, we will walk you through the key elements of the lightroom interface and help you navigate it like a pro.
So, let’s dive right in!
Key Points:
- Library module: The library module is where you import, organize, and manage your photos. It allows you to view and sort images, add keywords and metadata, and apply quick edits to enhance your photos.
- Develop module: The develop module is where you edit your photos in detail. It offers a wide range of powerful editing tools, including exposure adjustments, color correction, cropping, and spot removal. You can also apply presets and create your own custom edits.
- Importing and exporting: Lightroom allows you to easily import your photos from your camera or storage device. You can organize them into folders, add keywords, and apply metadata during the import process. When you’re done editing, you can export your photos in various file formats and sizes.
- Panels and tools: The lightroom interface consists of different panels and tools that provide you with easy access to all the editing features. The panels include basic, tone curve, hsl/color, and many more. Each panel contains sliders and controls to adjust specific aspects of your photo.
- Workspace customization: Lightroom offers a flexible workspace that you can customize according to your preferences. You can rearrange panels, hide or show specific tools, and save customized workspaces for different editing scenarios.
- Keyboard shortcuts: To speed up your workflow, lightroom comes with a range of useful keyboard shortcuts. These shortcuts allow you to perform common tasks quickly, such as switching between modules, applying adjustments, and navigating through images.
Now that you have a basic understanding of the lightroom interface, you’re ready to dive into editing your photos. In the next section, we will share some valuable tips and techniques to help you take your editing skills to the next level.
Stay tuned!
B. Importance Of Organizing Photos In Lightroom
Importance Of Organizing Photos In Lightroom
Organizing photos is a crucial step in effective photo editing. Lightroom offers a range of features to help you streamline your workflow and keep your photo library well-organized. Here are some key points highlighting the importance of organizing photos in lightroom:
- Simplified searching and browsing: By organizing your photos into folders and collections, you can easily locate specific images, saving you time and effort. Lightroom allows you to organize your photos based on various criteria such as date, location, keywords, and ratings.
- Enhanced editing experience: When your photos are organized, it becomes easier to navigate through your library and find the images you want to edit. This ensures a smooth and efficient editing process, as you won’t waste time searching for specific photos among a cluttered collection.
- Better project management: Lightroom enables you to create collections for different projects, making it simple to keep track of images for various purposes. Whether you’re working on a personal portfolio, client work, or a specific theme, having organized collections allows you to stay focused and organized throughout the entire editing process.
- Efficient workflow: With lightroom’s organizational features, you can establish a consistent and efficient workflow, reducing the time spent on unnecessary tasks. By keeping your photos organized, you can easily import, categorize, edit, and export them seamlessly, increasing your productivity as a photographer or photo editor.
- Improved collaboration: If you’re working with a team of photographers or sharing your work with others, organizing your photos in lightroom is essential for seamless collaboration. By organizing your photos and collections, you can easily share specific sets of images with others, ensuring everyone has access to the correct files.
Why Lightroom’S Organizational Tools Are Beneficial For Photographers
Lightroom provides a range of organizational tools to help photographers manage their photo libraries efficiently. These tools offer several benefits that can enhance your overall photography experience. Let’s explore some key advantages:
- Streamlined import process: Lightroom allows you to import photos directly from your camera or storage device, making it easy to organize and manage your images from the start. With customizable import presets, you can apply metadata, keywords, and other settings during the import process, reducing the need for manual organization later on.
- Flexible folder structure: Lightroom’s folder system allows you to create a logical structure for your photos, mirroring your real-world filing system. This makes it effortless to locate specific images or groups of photos, promoting a more organized and efficient workflow.
- Smart collections: Lightroom’s smart collection feature automatically gathers photos based on predefined criteria such as keywords, ratings, or date. This intelligent organizing tool eliminates the need for manual sorting, saving you precious time and effort.
- Keyword tagging: Lightroom’s keyword tagging system is an invaluable tool for organizing and searching images. By adding relevant keywords to your photos, you can easily find specific images by searching for those keywords. This enhances the discoverability of your images and simplifies the process of quickly locating specific photos.
- Metadata management: Lightroom enables you to add and modify metadata, such as copyright information, captions, and location data, to your photos. This not only helps you organize your images but also ensures that your work is properly attributed and protected.
- Sync capabilities: Lightroom’s cloud-based synchronization allows you to access your photos and organization system across multiple devices. This feature is especially beneficial for photographers on the go, as it keeps your entire photo library and organization structure consistent and readily available.
Organizing your photos in lightroom is essential for a seamless photo editing workflow. By taking advantage of lightroom’s organizational tools, you can simplify your searching and browsing experience, enhance your editing process, streamline project management, improve collaboration, and establish an efficient workflow.
These organizational features empower photographers to efficiently manage their photo libraries and focus on what they do best – capturing and editing stunning images.
C. Using Presets For Quick Edits
Lightroom presets are a powerful tool for streamlining your photo editing process. Whether you’re a professional photographer or an enthusiastic hobbyist, presets can save you time and help you achieve consistent results. Here are some key points to keep in mind when using presets:
- Speed up your workflow: Presets allow you to apply a specific set of edits to your photos with just one click. This can be especially useful when you have a large number of images to edit and want to maintain a consistent look and feel across your entire collection.
- Achieve a consistent style: By using presets, you can create a signature look for your photos. Whether you prefer vibrant, high-contrast images or a soft, muted aesthetic, presets can help you achieve the desired look without manually adjusting every single setting.
- Experiment with different looks: Lightroom offers a wide range of presets, from subtle enhancements to dramatic transformations. By exploring different presets, you can discover new editing styles and find the ones that best suit your artistic vision.
- Customize and fine-tune: While presets are a great starting point, they may not be a one-size-fits-all solution for every photo. After applying a preset, you can still make adjustments to individual settings to fine-tune the look to your liking. This flexibility allows you to maintain your creative control while benefiting from the time-saving aspect of presets.
- Save and share your presets: If you’ve created a preset that you love, you can save it and use it again in the future. Additionally, you can share your presets with others, allowing them to achieve similar editing results. This can be particularly valuable if you’re working on collaborative projects or want to maintain consistency across a team of photographers.
Presets can be a powerful tool in your photo editing toolbox, helping you save time, achieve a consistent style, and explore different creative looks. So why not give them a try and see how they can enhance your editing process?
D. Creating And Saving Your Own Presets
Photo editing plays a crucial role in enhancing the visual appeal of your images, and adobe lightroom is one of the most popular tools used by photographers for this purpose. In this blog post, we will explore the process of creating and saving your own presets in lightroom, which can save you valuable time and allow you to achieve consistent results.
Whether you want to apply a specific style or a set of adjustments to multiple images, presets are a powerful tool that can streamline your workflow. Let’s dive into the key points of creating and saving your own presets in lightroom.
1. Understanding Presets
- Presets in lightroom are pre-determined sets of adjustments that can be applied to photos with a single click.
- They can include a combination of changes like exposure, color grading, tone curve, and more.
- Presets allow you to achieve a desired look or style consistently across multiple images.
2. Applying And Modifying Built-In Presets
- Lightroom comes with a wide range of built-in presets that can serve as a starting point for your editing process.
- You can apply a preset to an image and then make further adjustments to customize it according to your preferences.
- Modifying and fine-tuning a preset can help you create your own unique style.
3. Creating Your Own Presets
- To create a custom preset, start by editing an image to your liking.
- Once you are satisfied with the adjustments, navigate to the develop module and click on the ‘+’ icon next to the presets panel.
- A dialog box will appear, allowing you to name your preset and choose the settings you want to include.
- You can select specific adjustments or choose to include all the changes you made to the image.
4. Organizing And Saving Presets
- Lightroom provides various options to organize and manage your presets.
- You can create folders within the presets panel to categorize your presets and make them easier to locate.
- To save your presets, click on the ‘+’ icon in the presets panel, choose ‘new folder’ or ‘new preset’, and follow the prompts.
- It’s important to save your presets in a location that is easily accessible for future use.
5. Sharing And Exporting Presets
- If you want to share your presets with others or use them on a different device, you can export them as a file.
- To export a preset, right-click on it in the presets panel and choose ‘export’.
- You can save the preset file on your computer or a removable storage device.
- To import presets from another source, click on the ‘+’ icon in the presets panel and choose ‘import presets’.
Creating your own presets in lightroom can significantly speed up your editing process and help you maintain a consistent style. Experiment with different adjustments and combinations to develop your unique presets that reflect your artistic vision. Now that you have a grasp of the key points, let’s delve deeper into each step and explore the endless possibilities of photo editing with lightroom.
Iii. Basic Lightroom Editing Techniques
Whether you’re a professional photographer or an amateur enthusiast, learning how to edit your photos using lightroom is essential. With its powerful tools and user-friendly interface, lightroom allows you to transform your raw images into stunning masterpieces. In this section, we will explore the basic editing techniques that will take your photos to the next level.
From adjusting exposure to enhancing colors, let’s dive into the world of lightroom editing:
1. Exposure Adjustment:
- Adjusting exposure is the foundation of any photo edit.
- Use the exposure slider to brighten or darken your image.
- Find the right balance to enhance the details and tones in your photo.
2. White Balance Correction:
- Correcting white balance ensures natural and accurate colors.
- Use the white balance tool to remove color casts and achieve the desired look.
- Experiment with different settings to find the perfect temperature and tint.
3. Contrast And Clarity:
- Boost the overall contrast to add depth and create a dynamic look.
- Adjust the clarity slider to enhance mid-tone contrast and bring out details.
- Strike a balance between these two settings to achieve a visually appealing outcome.
4. Saturation And Vibrance:
- Increase the saturation to make colors more vibrant and intense.
- Use the vibrance slider to enhance the saturation without over-saturating skin tones.
- Be mindful of maintaining a natural feel while making these adjustments.
5. Crop And Straighten:
- Utilize the crop tool to improve composition and remove distractions.
- Straighten crooked horizons to ensure a balanced and harmonious image.
- Experiment with different ratios and aspect ratios to find the most visually pleasing result.
6. Sharpening And Noise Reduction:
- Apply sharpening to enhance details and make your image more crisp.
- Use the noise reduction tool to reduce unwanted noise and grain.
- Achieve a balance between sharpness and noise reduction for a polished photo.
With these basic lightroom editing techniques, you now have the skills to transform your photos from ordinary to extraordinary. Don’t be afraid to experiment and explore different adjustments to find your own unique style. Remember, practice makes perfect, so keep refining your skills and before you know it, your photos will be captivating and awe-inspiring.
Stay tuned for the next section where we’ll delve into more advanced lightroom editing techniques.
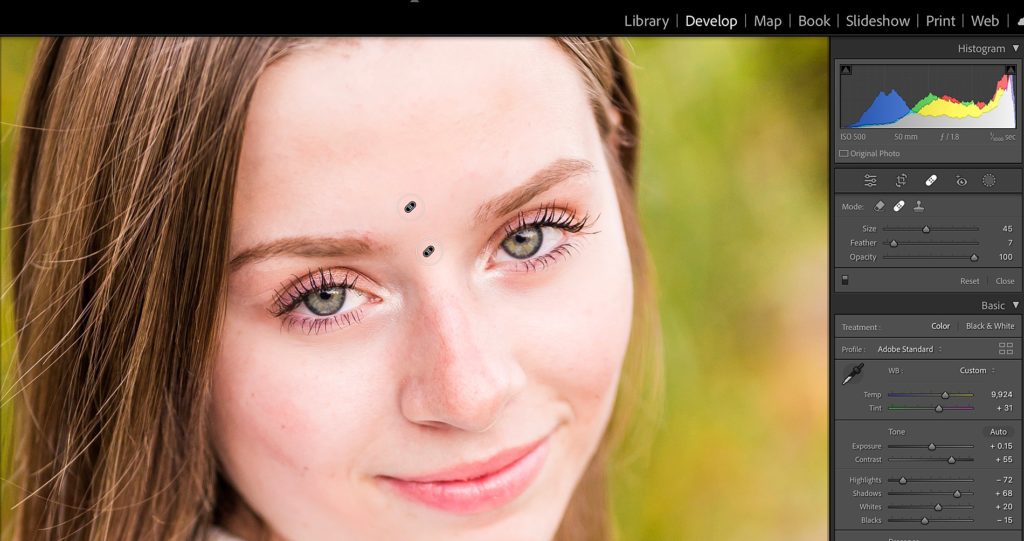
A. Adjusting Exposure And Contrast
One of the fundamental aspects of photo editing is adjusting the exposure and contrast levels. These settings play a crucial role in enhancing the overall look and feel of your photos. Whether you’re a beginner or an experienced photographer, knowing how to manipulate exposure and contrast can take your images to the next level.
In this section, we will explore some tips and techniques to help you master this aspect of photo editing in lightroom. So, let’s dive in!
Understanding Exposure:
- The exposure of a photo determines how light or dark it appears.
- Proper exposure ensures that the details in the highlights and shadows are well-preserved.
- Overexposure makes a photo too bright, while underexposure makes it too dark.
- Adjusting exposure allows you to brighten or darken the entire image.
Tips For Adjusting Exposure:
- Start by analyzing the histogram, a graphical representation of the image’s tonal distribution.
- Slide the exposure slider to the right to increase the brightness and to the left to decrease it.
- Make subtle adjustments to avoid loss of details in highlights or shadows.
- Use the “auto” feature to get a quick starting point and then fine-tune manually.
- Experiment with exposure to achieve the desired mood or lighting effect.
Understanding Contrast:
- Contrast refers to the difference between the dark and light areas in an image.
- It adds depth, dimension, and visual interest to a photograph.
- Increasing contrast makes the dark areas richer and the light areas brighter.
- Decreasing contrast adds a softer and more diffused look to the image.
Tips For Adjusting Contrast:
- Use the contrast slider to increase or decrease the overall contrast of the image.
- Avoid pushing the slider to the extremes as it can result in loss of details.
- Adjust the highlights and shadows sliders to fine-tune the contrast in specific areas.
- Try using the “clarity” slider to add a special touch of contrast to landscapes or portraits.
- Experiment with different levels of contrast to find the right balance for your photo.
Mastering the art of adjusting exposure and contrast in lightroom can significantly enhance the visual impact of your photos. Remember to keep the changes subtle and maintain the integrity of the image while making adjustments. So, start practicing these tips, and you’ll be well on your way to creating stunning photos with the perfect exposure and contrast levels.
B. Fine-Tuning Color Temperature And Tint
When it comes to photo editing in lightroom, one crucial aspect is fine-tuning the color temperature and tint. These adjustments allow you to enhance the overall look and feel of your images by manipulating the warmth or coolness of the colors.
Here are some tips on how to effectively fine-tune the color temperature and tint in lightroom:
- Use the white balance tool: Lightroom provides a white balance tool that enables you to easily correct any color cast in your photos. Simply click on the eyedropper tool and select an area in your image that should be neutral in color, such as a white or gray object. Lightroom will automatically adjust the color temperature and tint accordingly.
- Adjust the temperature slider: The temperature slider lets you control the warmth or coolness of your image. Moving the slider to the right adds warmth, making the colors appear more yellow or orange. Conversely, sliding it to the left adds coolness, resulting in a bluish or cyan tint. Experiment with different settings to achieve the desired mood and ambiance in your photos.
- Fine-tune with the tint slider: The tint slider allows you to adjust the green or magenta tint in your image. Shift it to the left to add more green tones, or to the right to introduce magenta hues. This adjustment is particularly useful for correcting skin tones or achieving a particular color look.
- Consider the lighting conditions: When fine-tuning color temperature and tint, take into account the lighting conditions under which the photo was taken. If the image was captured in warm, golden-hour lighting, you may want to enhance the warm tones. For images shot in cooler, blue-hour lighting, adjusting towards cooler tones can create a harmonious atmosphere.
- Aim for natural-looking edits: While it can be tempting to go for dramatic color shifts, it’s generally best to aim for natural-looking edits that enhance the image without making it look artificial. Don’t be afraid to experiment, but exercise restraint to maintain a realistic appearance.
By following these tips, you can master the art of fine-tuning color temperature and tint in lightroom, enhancing the visual impact of your photographs.
C. Enhancing Vibrancy And Saturation
In today’s digital world, photographs often need a boost to truly shine. Enhancing vibrancy and saturation in your photos can make them more captivating and visually appealing. Whether you want to make colors pop in a landscape shot or add vibrancy to a portrait, lightroom offers powerful tools to help you achieve the desired effect.
Key Points:
- Adjusting vibrancy and saturation can breathe life into dull or flat-looking images.
- Increasing vibrancy enhances the intensity of colors without affecting skin tones.
- Saturation, on the other hand, boosts the overall intensity of colors, including skin tones.
- It’s important to strike the right balance between vibrancy and saturation, as excessive adjustments can result in unrealistic-looking photos.
- Lightroom’s intuitive interface makes it easy to fine-tune the vibrance and saturation levels to achieve the desired aesthetic.
- When working with vibrancy and saturation, it’s a good idea to start with subtle adjustments and gradually increase them until you achieve the desired effect.
- Experiment with different settings to find the perfect balance for each specific photo.
- Keep in mind that the impact of vibrancy and saturation adjustments may vary depending on the original image and its colors.
- Using a calibrated monitor can help ensure that the vibrancy and saturation adjustments appear as intended on various devices and platforms.
- Remember to save your edited photos in the appropriate file format and resolution for your desired use, whether it’s for web or print.
By using the powerful vibrancy and saturation tools in lightroom, you can breathe new life into your photos and create visually stunning images that stand out from the crowd. Experiment with different settings and find the perfect balance for each photo to make your colors truly pop.
So, why settle for flat and dull images when you can enhance their vibrancy and saturation with just a few simple adjustments? Let your creativity shine and transform your photos into eye-catching masterpieces.
D. Using The Tone Curve For Advanced Contrast Control
The tone curve is a powerful tool in lightroom that allows you to fine-tune the contrast and tonal range of your photos. By adjusting the points on the tone curve, you can make targeted adjustments to different tonal areas of your image, such as highlights, shadows, and midtones.
Here are some key tips for using the tone curve for advanced contrast control:
- Adjusting the highlights: Dragging the top-right point of the tone curve upward will brighten the highlights, while dragging it downward will darken them. This can help you recover blown-out details or add more drama to your image.
- Enhancing the shadows: Moving the bottom-left point of the curve upward will brighten the shadows, revealing more detail in the darker areas of your photo. Conversely, dragging it downward will darken the shadows, giving your image a more moody or mysterious look.
- Boosting midtone contrast: Making an s-shaped curve by dragging the middle of the tone curve upward and the ends downward can add contrast to the midtones, giving your image more depth and dimension.
- Fine-tuning specific tonal ranges: By placing additional points on the curve and adjusting their positions, you can make targeted adjustments to specific tonal ranges. For example, you can add a point in the midtones and drag it upward to brighten that range while leaving the highlights and shadows untouched.
- Using the point curve presets: Lightroom provides various preset curve options, such as linear, medium contrast, strong contrast, and custom. These presets can serve as a starting point for your editing and can be easily applied and tweaked to achieve the desired look.
The tone curve in lightroom is a versatile tool that gives you precise control over the contrast and tonal range in your photos. By understanding how to manipulate the curve points and presets, you can enhance the overall visual impact of your images and create a more compelling and dynamic look.
Experiment with different adjustments and see how they can transform your photos.
E. Cropping And Straightening For Better Composition
When it comes to photo editing, one of the most crucial aspects is ensuring that your composition is on point. Cropping and straightening your images can greatly enhance the overall look and feel of your photographs. Here are some key tips to keep in mind:
- Cropping:
- Crop out any distracting elements: Remove any unnecessary objects or elements that may detract from the main subject of your photo. This helps to create a cleaner and more focused composition.
- Adjust the aspect ratio: Experiment with different aspect ratios to give your photo a unique and eye-catching look. Play around with square, portrait, or landscape orientations to see which one works best for your image.
- Rule of thirds: Utilize the rule of thirds by placing your subject or focal point along the intersecting lines or points. This helps to create a sense of balance and visual interest in your composition.
- Straightening:
- Fix crooked horizons: If your photo has a crooked horizon line, use the straighten tool to align it properly. A level horizon adds a professional touch to your image and makes it more visually appealing.
- Correct converging lines: When shooting architecture or tall buildings, perspective distortion can occur, causing converging lines. Straighten these lines to create a more balanced and aesthetically pleasing composition.
By implementing these cropping and straightening techniques in lightroom, you can significantly improve the composition of your photos. Take the time to experiment and find the best composition that enhances the overall visual impact of your images. Remember, a well-composed photograph is more likely to captivate your audience and leave a lasting impression.
Iv. Advanced Lightroom Editing Techniques
If you’ve mastered the basics of editing in lightroom and are ready to take your skills to the next level, it’s time to delve into some advanced techniques. These advanced editing techniques will help you enhance your photos even further, bringing out the best in your images.
Let’s explore these techniques in detail:
1. Hsl Adjustments
- Adjust the hue, saturation, and luminance of individual colors to fine-tune the overall look of your photo.
- Experiment with different color combinations to create unique effects and moods.
2. Split Toning
- Add a touch of creativity to your images by adding different tones to the highlights and shadows.
- Enhance the mood and atmosphere of your photo with warm or cool tones.
3. Graduated Filter
- Use the graduated filter tool to selectively adjust the exposure, clarity, saturation, and other settings in specific areas of your photo.
- Create a smooth transition between different exposures or colors in landscapes or other complex scenes.
4. Radial Filter
- Draw attention to a specific subject or area in your photo by applying adjustments within a circular or oval-shaped mask.
- Experiment with different adjustments to create unique and stunning effects.
5. Adjustment Brush
- Refine your editing by making precise adjustments using the adjustment brush tool.
- Paint over specific areas to selectively adjust exposure, contrast, saturation, sharpness, and more.
6. Targeted Adjustment Tool
- Use the targeted adjustment tool to selectively adjust the color tones of specific parts of your image.
- Simply click and drag on a specific area to adjust the hue, saturation, or luminance.
7. Lens Corrections
- Correct lens distortions, chromatic aberrations, and vignetting in your photos.
- Improve the overall clarity and sharpness of your images with the lens corrections panel.
8. Brushes And Filters
- Take advantage of the wide range of brushes and filters available in lightroom to add creative effects to your photos.
- Experiment with different settings and textures to achieve your desired look.
9. Noise Reduction
- Reduce the appearance of noise and grain in your photos for a cleaner and more professional finish.
- Adjust the luminance and color noise reduction sliders to find the right balance for your image.
10. Hdr Merge
- Combine multiple exposures of the same scene to create an hdr (high dynamic range) image with a wide range of tones.
- Merge bracketed shots and fine-tune the settings to achieve a natural and balanced final result.
By incorporating these advanced lightroom editing techniques into your workflow, you’ll have the tools to take your photos to new heights. Experiment, practice, and most importantly, have fun with the endless possibilities that lightroom offers. Happy editing!
A. Using The Graduated Filter For Landscape Photos
**a. Using the graduated filter for landscape photos**
When it comes to enhancing landscape photos, lightroom’s graduated filter tool can be a real game-changer. This powerful feature allows you to selectively adjust specific areas of your image, bringing out the best in each element. Whether you want to darken a sky, enhance the colors of a sunset, or emphasize the details in a foreground, the graduated filter can help you achieve stunning results.
Here are some key points to keep in mind when using the graduated filter in lightroom:
Using The Graduated Filter Tool:
- Start by selecting the graduated filter tool from the toolbar or by pressing the m key on your keyboard.
- Click and drag on your image to create a graduated filter. The filter will blend the adjustments smoothly from one point to another.
- Adjust the position, size, and angle of the graduated filter as needed to target the specific area you want to edit.
- Make sure to select the “edit” option in the graduated filter panel to access its adjustment settings.
- Experiment with the different adjustment sliders to fine-tune the desired effect. You can modify exposure, contrast, saturation, clarity, and other parameters to achieve the desired look.
- To achieve a natural and subtle effect, avoid over-editing. Gradual adjustments often work best for landscape photographs.
- You can add multiple graduated filters to the same image, allowing you to apply different adjustments to different areas.
- If you want to compare the before and after results, simply toggle the “show selected mask overlay” option in the toolbar or press the o key on your keyboard.
By mastering the graduated filter tool in lightroom, you can elevate your landscape photography to new heights. It offers a level of control and precision that can truly make your images stand out. So, next time you’re looking to enhance the landscape elements in your photos, give the graduated filter a try and see the stunning transformations it can bring.
B. Utilizing The Radial Filter For Spotlight Effects
Lightroom offers a wide range of tools to enhance your photographs, and one such tool that can be particularly useful for adding spotlight effects is the radial filter. This powerful feature allows you to target specific areas of your image and apply various adjustments, creating an impactful and eye-catching effect.
Whether you want to draw attention to a particular subject or create a sense of drama, the radial filter can help you achieve your desired results. Here are some key points to keep in mind when using the radial filter:
- Increase or decrease exposure: Use the radial filter to brighten or darken specific areas of your image by adjusting the exposure settings. This can help create a spotlight effect by emphasizing the subject and creating a sense of depth.
- Enhance colors and details: In addition to exposure adjustments, you can also make targeted changes to the colors and details within the radial filter. Boost vibrance, saturation, or clarity to make your subject pop and stand out from the rest of the image.
- Soften or sharpen edges: If you want to create a more seamless blend between the spotlighted area and the surrounding background, you can use the radial filter to soften or sharpen the edges. This can help create a more natural and professional-looking effect.
- Refine the mask: The radial filter allows you to further customize the spotlight effect by refining the mask. You can adjust the size, shape, and feathering of the radial filter to achieve the desired level of focus and intensity.
- Combine with other adjustments: The radial filter is a versatile tool that can be combined with other adjustments in lightroom to further enhance your photos. Consider using it in conjunction with other tools like the gradient filter or adjustment brush to create even more complex and dynamic effects.
The radial filter in lightroom is a powerful tool that can help you take your photo editing to the next level. Experiment with different settings and adjustments to see how you can use it to create stunning spotlight effects in your images.
Remember to have fun and let your creativity shine through!
C. Mastering The Adjustment Brush For Selective Editing
The adjustment brush is a powerful tool in lightroom that allows you to make precise edits to specific areas of your photo. Whether you want to brighten up a subject’s face, enhance the colors of a landscape, or add selective sharpening to certain objects, the adjustment brush can help you achieve the desired effect.
Here are some key points to keep in mind when mastering the adjustment brush:
- Brush size and feathering: Before you start brushing, adjust the size and feathering of the brush to match the area you want to edit. A larger brush size is useful for broad adjustments, while a smaller brush size is ideal for fine details. Feathering helps blend the edits seamlessly with the surroundings.
- Brush density and flow: The density and flow sliders control the intensity and gradualness of the edits. Higher density will make the adjustments more pronounced, while lower density will make them more subtle. Adjust the flow slider to control how quickly the edits are applied as you brush over the area.
- Mask overlay: Enabling the mask overlay feature allows you to see exactly where you’ve brushed on the photo. This visual aid helps ensure accurate and precise editing. You can toggle the overlay on and off by pressing the “o” key on your keyboard.
- Adjustment options: Lightroom provides various adjustment options that you can apply using the adjustment brush. From exposure and contrast to saturation and clarity, you have control over a range of effects. Experiment with different combinations to achieve the desired look.
- Erasing and adding adjustments: If you’ve made a mistake or want to fine-tune your edits, use the eraser brush to remove specific areas or click on the “new” button to add additional adjustments. This flexibility allows you to craft the image exactly as you envision it.
Mastering the adjustment brush in lightroom opens up a world of possibilities for selective editing. By refining your skills with brush size, feathering, density, and flow, and utilizing the mask overlay and adjustment options, you can take your photo editing to the next level.
So grab your brush and start experimenting with this powerful tool to bring out the best in your images.
D. Using The Spot Removal Tool For Cleaning Up Images
Photo Editing Tips: Lightroom
Welcome back, photography enthusiasts! In today’s blog post, we’re diving into the wonderful world of photo editing with adobe lightroom. This powerful software not only allows you to enhance your images but also gives you the tools to bring out the best in your photography.
In this section, we will focus on **using the spot removal tool for cleaning up images**. Let’s explore some key points that will help you master this feature:
The spot removal tool in lightroom is an invaluable asset when it comes to cleaning up imperfections in your images. Here’s how you can make the most of this powerful tool:
- Identify and remove distracting elements: Use the spot removal tool to remove any unwanted objects or distractions that may appear in your photos. Simply select the tool, adjust the brush size, and click on the element you want to remove. Lightroom will intelligently analyze the surrounding area and seamlessly fill in the gap.
- Fix blemishes and skin imperfections: Portraits often require a little touch-up to achieve a flawless look. With the spot removal tool, you can easily diminish blemishes, acne, or other skin imperfections. Adjust the brush size to match the size of the blemish, click on it, and watch as lightroom works its magic.
- Eliminate sensor dust and scratches: Dust particles and scratches on your camera sensor can sneak their way into your images and ruin an otherwise perfect shot. Fear not, as the spot removal tool can help you banish these pesky anomalies. Zoom in on the affected area, select the tool, and carefully brush over the imperfections for a clean and spotless result.
- Restore old photos: Do you have precious old photos that have seen better days? The spot removal tool can be a game-changer when it comes to resurrecting these nostalgic treasures. By carefully brushing over scratches, tears, or stains, you can bring back the original beauty of these cherished memories.
- Fine-tune the results: After applying spot removal, you may need to adjust the opacity of the edits for a more natural look. Lightroom gives you the flexibility to fine-tune your edits, ensuring they seamlessly blend with the rest of the image.
There you have it! By utilizing the spot removal tool in lightroom, you can wave goodbye to unwanted distractions, imperfections, and dust particles, allowing your images to shine. Stick around for the next section, where we’ll explore another exciting aspect of photo editing with lightroom.
Keep capturing those incredible moments!
E. Applying Noise Reduction For Cleaner Images
When it comes to photo editing, one crucial aspect is reducing noise in your images. Noise refers to the random variations in brightness or color that can make your photos look grainy or muddled. Fortunately, adobe lightroom offers powerful tools to help you tackle this issue and achieve cleaner, more professional-looking images.
Below are some key points to keep in mind when applying noise reduction in lightroom:
- Start by selecting the image(s) you want to work on and navigate to the develop module in lightroom.
- In the right-hand panel, scroll down until you find the detail section. This is where all the noise reduction adjustments are located.
- Adjust the luminance slider to reduce the overall luminance noise in your image. Be careful not to overdo it, as it can result in loss of details and a plastic-like appearance. Zoom in to 100% to ensure you’re achieving the desired effect.
- If you still notice color noise in your image, use the color slider to selectively reduce it. Be cautious not to oversaturate or desaturate specific areas of your photo.
- It’s important to find the right balance between noise reduction and preserving fine details. Use the detail slider to adjust the level of sharpness in your image while controlling noise reduction.
- Lightroom also offers a masking slider, which allows you to apply noise reduction selectively to areas that need it the most. Hold the alt/option key while adjusting the slider to visualize which parts of your image are affected.
- Keep in mind that noise reduction is not a one-size-fits-all solution. It may differ depending on the iso used, camera model, and other factors. Experiment with different settings to find what works best for your specific image.
- Don’t forget to compare your edited image with the original to ensure you’re achieving the desired results.
- Finally, apply your noise reduction adjustments, and you’re ready to showcase your cleaner, more professional-looking photos.
By mastering noise reduction techniques in lightroom, you can elevate your image editing skills and produce stunning visuals that stand out from the crowd. Take the time to experiment with different settings and find the perfect balance between reducing noise and maintaining important details.
With a clean and polished look, your photos will captivate viewers and leave a lasting impression.
V. Lightroom Tips For Black And White Photography
Photography enthusiasts often turn to adobe lightroom to enhance their images and bring out their best qualities. One area where lightroom truly shines is black and white photography. By applying some simple but effective techniques, you can transform your color photos into stunning monochrome masterpieces.
In this section, we’ll delve into some valuable lightroom tips that will take your black and white photography to the next level.
Presets For Black And White Conversions:
- Lightroom offers a wide range of presets specifically designed for black and white conversions. These presets can instantly give your images a classic or contemporary black and white look.
- Experiment with different presets to find the one that best suits the mood and style you want to convey in your black and white images.
- Adjust the intensity of the preset using the opacity slider to fine-tune the overall effect.
Adjusting The Tone Curve:
- The tone curve tool in lightroom allows you to control the tonal range and contrast in your black and white photos.
- Use the sliders to adjust the highlights, shadows, and midtones to achieve the desired tonal balance.
- By manipulating the curve, you can create dramatic contrasts or subtle tonal gradations, adding depth and dimension to your black and white images.
Enhancing Contrast And Clarity:
- Boosting the contrast and clarity in your black and white images can make them more visually appealing and impactful.
- Use the basic panel in lightroom to increase the contrast, making the blacks darker and the whites brighter.
- Adjust the clarity slider to enhance the details and textures in your black and white photos, giving them a crisp and defined look.
Utilizing The Hsl Panel:
- The hsl panel in lightroom allows you to fine-tune the individual color channels in your black and white images.
- Adjust the sliders for hue, saturation, and luminance to influence the way different colors are rendered in black and white.
- This powerful tool enables you to create unique and customized black and white conversions by selectively darkening or lightening specific colors.
Adding Vignettes And Grain:
- Adding a subtle vignette effect can draw the viewer’s attention to the subject and create a more immersive viewing experience in black and white photography.
- Lightroom provides options to easily add vignettes, allowing you to control the size, shape, and intensity of the vignette effect.
- Additionally, introducing a touch of grain can emulate the nostalgic look of film in your black and white images, evoking a sense of timelessness and artistic flair.
Mastering the art of black and white photography in lightroom opens up a world of creative possibilities. With these helpful tips, you can transform your color images into captivating black and white compositions that command attention and evoke emotions. Experiment, explore, and let your vision shine through in every monochrome masterpiece you create.
A. Converting Color Photos To Black And White
Converting Color Photos To Black And White
Editing photos in adobe lightroom allows you to transform your images in a variety of ways, including converting color photos to black and white. This technique can create stunning and timeless photos that capture the essence of your subject in a unique way.
Whether you want to evoke a sense of nostalgia or add a touch of elegance to your images, here are some tips to help you effectively convert your color photos to black and white:
Understanding The Art Of Black And White Photography:
- Emphasize contrast: Black and white images rely heavily on contrast to create impact. Pay attention to the tonal range in your photo and adjust the contrast accordingly to make your subject standout.
- Highlight texture and shape: Without color distractions, black and white photos can emphasize the textures and shapes in your composition. Experiment with different lighting conditions and angles to capture interesting details.
- Convey emotion: Black and white photography has a unique ability to convey a wide range of emotions. Explore the mood you want to evoke in your image and adjust the tonal values and composition accordingly.
- Focus on composition: With color stripped away, the composition becomes even more crucial in black and white photography. Pay attention to lines, patterns, and the rule of thirds to create visually compelling images.
Converting Color Photos To Black And White In Lightroom:
- Use the black & white panel: In lightroom’s develop module, navigate to the black & white panel. Here, you can adjust the individual color channels to fine-tune the grayscale conversion. Experiment with the sliders to achieve your desired look.
- Play with the tone curve: The tone curve tool in lightroom allows you to make precise tonal adjustments. By manipulating the curve, you can enhance contrast and make your subject pop in your black and white photo.
- Experiment with presets: Lightroom offers a variety of presets specifically designed for black and white conversions. Explore these presets to find inspiration and save time by starting with a pre-configured setting.
- Make localized adjustments: Sometimes, certain areas of your photo may benefit from different color values or tonal adjustments. Utilize lightroom’s adjustment brushes or graduated filters to selectively modify parts of your image.
With these tips in mind, you can now confidently convert your color photos to black and white in lightroom. Experiment, explore different techniques, and let your creativity guide you as you transform your images into stunning monochromatic masterpieces.
B. Adjusting Black And White Mix For Tonal Control
Photo editing is a crucial aspect of photography, allowing you to enhance and transform your images creatively. One of the most powerful tools for this purpose is adobe lightroom. In this blog post, we will explore some valuable tips and tricks that will help you achieve stunning results using lightroom’s black and white mix feature.
By adjusting the black and white mix, you can have better control over tonal variations in your images. Let’s dive in and discover how to make the most of this feature.
Understanding The Black And White Mix Feature:
- The black and white mix feature in lightroom allows you to adjust the tonal values of different colors in your black and white images.
- By manipulating these tonal values, you can create the desired contrast and mood in your photographs.
- This feature enables you to emphasize or de-emphasize specific elements in your image by selectively adjusting the brightness or darkness of particular colors.
Adjusting Tonal Values For Added Depth:
- To enhance the depth and dimension of your black and white images, experiment with the black and white mix sliders to control the brightness and darkness of different colors.
- By brightening the tones that correspond to elements you want to highlight, you can draw the viewer’s attention to specific areas of your photograph.
- Conversely, darkening certain tones can create a sense of drama and add depth to the overall composition.
Balancing Tones For A Harmonious Look:
- Achieving a harmonious and balanced tonal range is vital in black and white photography. The black and white mix feature allows you to fine-tune the tonal values of different colors to achieve this balance.
- Experiment with the sliders to adjust the luminance of various colors and create a visually pleasing distribution of tones in your image.
- By carefully balancing the highlights, midtones, and shadows, you can create an image that is visually striking and holds the viewer’s attention.
Enhancing Textures And Details:
- The black and white mix feature can also be used to enhance textures and details in your black and white images.
- Adjusting the tonal values of specific colors can bring out the fine details and textures in your photograph, adding depth and richness to the image.
- By selectively boosting or reducing the brightness of different colors, you can emphasize or soften the textures in your image, creating a visually engaging outcome.
Incorporating the black and white mix feature in your photo editing workflow can significantly enhance your black and white images. With its ability to adjust tonal values, you can create stunning and impactful photographs. Experiment with different color adjustments using the sliders in lightroom’s black and white mix to achieve your desired artistic vision.
So, let your creativity flow and have fun exploring the endless possibilities of this powerful tool in lightroom.
C. Using Contrast And Clarity For Dramatic Black And White Photos
Black and white photography has an undeniable charm that can instantly elevate the mood and impact of an image. One way to enhance the drama and power of your black and white photos is by using contrast and clarity adjustments in lightroom.
These adjustments allow you to enhance the tonal range, make the dark areas darker, the light areas lighter, and create a more defined and detailed image. Here are some key points to keep in mind when using contrast and clarity in lightroom:
- Contrast:
- Increase the contrast to make the blacks appear darker and the whites appear brighter.
- This helps to create a more impactful and visually striking black and white image.
- Be careful not to overdo it, as excessive contrast can result in loss of details in the highlights and shadows.
- Adjust the contrast slider in lightroom until you achieve the desired balance of light and dark tones.
- Clarity:
- Clarity enhances the definition and sharpness of the mid-tones in your photo.
- By increasing clarity, you can bring out the texture and details in your black and white images.
- However, be cautious not to over-sharpen the photo, as it can lead to unwanted artifacts or noise.
- Gradually adjust the clarity slider in lightroom until you find the right level of sharpness and detail.
- Local adjustments:
- When using contrast and clarity, consider applying these adjustments selectively to specific areas of the image.
- Use the brush tool or adjustment brush in lightroom to paint over the areas where you want to enhance the contrast or clarity.
- This allows you to have better control over the impact and effect of these adjustments.
- Presets and profiles:
- Lightroom offers a wide range of presets and profiles specifically designed for black and white photography.
- Experiment with different presets and profiles to find the one that best suits the mood and style you want to achieve in your black and white photos.
- Remember that presets and profiles are starting points that can be further fine-tuned to match your vision.
By using contrast and clarity adjustments in lightroom, you can take your black and white photos to the next level. Remember to find the right balance, apply adjustments selectively, and explore different presets and profiles to bring out the drama and impact of your images.
D. Applying Filters For Different Black And White Effects
Black and white photography is a classic and timeless art form that can evoke a sense of nostalgia, drama, or simplicity. While lightroom offers a range of options for editing your photos, applying filters for different black and white effects can take your images to the next level.
Whether you want to create a vintage look or add a modern twist, here are some tips for applying filters in lightroom:
High Contrast:
- Increase clarity: This filter enhances the mid-tone contrast, making the image appear sharper and more defined.
- Adjust highlights and shadows: Fine-tune the brightness levels of the highlights and shadows to create a distinct contrast between the light and dark areas of the photograph.
- Increase whites: Boosting the whites can create a striking contrast against the black tones, adding depth and drama to the image.
Film Grain:
- Grain amount: Adjusting the grain amount can mimic the texture of film, giving your black and white photos a nostalgic and vintage feel.
- Grain size: Experimenting with different grain sizes can create various effects, from fine and subtle to coarse and gritty.
- Grain roughness: This setting determines how rough or smooth the grain appears. Increasing the roughness can add an edgy and artistic touch to your images.
Split Toning:
- Highlights and shadows: By adding different hues to the highlights and shadows separately, you can introduce subtle color tones to your black and white photos. For example, adding a warm tone to the highlights and a cool tone to the shadows can produce a unique and captivating effect.
- Balance: Adjusting the balance slider allows you to control the distribution of the split toning effect between the highlights and shadows.
Tone Curve:
- Contrast: With the tone curve tool, you can adjust the contrast and brightness of specific tonal ranges in your black and white photos. Experiment with different curves to achieve the desired effect.
- Highlights and shadows: Fine-tune the highlights and shadows using the tone curve, giving your images a distinctive look by emphasizing or reducing certain tonal areas.
- S curve: Create a classic film-inspired effect by applying an s curve to the tone curve tool. This can enhance the dynamic range and add depth to your black and white photos.
By exploring the various filters available in lightroom, you can transform your black and white photos into captivating works of art. Experiment with different settings and combinations to achieve the desired effect for each image. Remember, the beauty of black and white photography lies in its ability to evoke emotion and tell a story through contrast and texture.
Let your creativity flow as you apply filters and bring your vision to life.
E. Using The Tone Curve For Advanced Black And White Edits
Black and white photography has a timeless appeal and can add a touch of sophistication to your images. With adobe lightroom’s tone curve tool, you can take your black and white edits to the next level. By manipulating different points on the tone curve, you can adjust the tonal values of specific areas in your image, allowing for more precise control over the black and white conversion process.
Here are some key points to keep in mind when using the tone curve tool in lightroom:
- Enhancing contrast and tonal range: The tone curve tool in lightroom provides you with the flexibility to adjust the contrast and tonal range in your black and white images. By dragging the points on the curve, you can fine-tune the highlights, midtones, and shadows to add depth and dimension to your photo.
- Creating drama with s-shaped curves: Experimenting with s-shaped curves can bring a sense of drama to your black and white images. By raising the highlights and lowering the shadows, you can create a more pronounced contrast, resulting in a visually striking photo.
- Selective adjustments with the targeted adjustment tool: Lightroom’s tone curve tool also features a targeted adjustment tool, which allows you to make targeted adjustments to specific areas of your image. By clicking and dragging on the image, you can easily modify the tonal values of that particular area, giving you even more control over the black and white conversion.
- Using presets and profiles: Lightroom offers a wide range of presets and profiles specifically designed for black and white editing. These presets can serve as a starting point for your edits and help you achieve the desired look with just a few clicks. Experimenting with different presets and profiles can save you time and inspire new creative ideas.
- Fine-tuning with rgb channels: The tone curve tool in lightroom also allows you to make adjustments to the red, green, and blue channels individually. This feature can be especially useful when it comes to correcting colorcast issues in your black and white images. By making subtle adjustments to the individual channels, you can achieve a more balanced and visually pleasing black and white conversion.
- Applying a vignette: To add a finishing touch to your black and white edits, consider applying a subtle vignette. This can help draw the viewer’s attention to the subject and add a sense of depth to the image. Lightroom’s tone curve tool allows you to create a vignette effect by adjusting the tone curve for the highlights and shadows.
The tone curve tool in adobe lightroom is a powerful tool that can take your black and white edits to new heights. With its flexibility and precision, you can enhance contrast, create dramatic effects, and make selective adjustments to achieve your desired black and white look.
Experiment with different curves, presets, and profiles to unlock your creativity and create stunning black and white images.
Vi. Exporting And Sharing Your Edited Photos
Photo editing is an essential step in the photography process, and lightroom is one of the most popular tools used by professionals and hobbyists alike. Once you have perfected your edits and are ready to showcase your work to the world, it’s important to know how to export and share your edited photos effectively.
In this section, we will discuss some key tips and techniques to help you streamline this process and ensure that your photos look their best when viewed by others.
Exporting Your Edited Photos
- After making your final adjustments in lightroom, it’s time to export your edited photos.
- To begin, navigate to the “file” menu and select “export”.
- Choose the desired location on your computer where you want to save the exported photos.
- Select the file format that best suits your needs. Jpeg is a common choice for sharing images online, as it provides a good balance between image quality and file size.
- Adjust the image quality settings based on where you plan to share the photos. For web sharing, a quality setting of around 80-90 is usually sufficient.
- Consider resizing the images if necessary, especially if you plan to share them on social media platforms that have size limitations.
- Double-check that the export settings are correct and click the “export” button to save your edited photos to the specified location.
Sharing Your Edited Photos
- Once your photos are exported, it’s time to share them with your audience.
- If you are sharing on social media platforms, be mindful of the recommended image sizes and dimensions for optimal display.
- Add relevant captions or descriptions to provide context and engage your audience.
- Use hashtags strategically to increase the visibility of your photos on platforms like instagram and twitter.
- Consider creating a dedicated website or online portfolio to showcase your edited photos. This allows for more control over the presentation and organization of your work.
- When sharing on websites or blogs, ensure that the images are properly optimized for web display to minimize loading times.
- Consider watermarking your photos to protect your work and maintain credit as they are shared online.
- Engage with your audience by responding to comments and feedback, and encourage sharing and interaction with your photos.
By following these tips for exporting and sharing your edited photos, you can ensure that your hard work in lightroom is showcased in the best possible way. Remember to consider the platform or medium where you’ll be sharing your photos, and tailor your export settings accordingly.
With a well-executed export and sharing strategy, you can effectively showcase your skills and creativity to a wider audience.
A. Understanding Export Settings For Different Platforms
Understanding Export Settings For Different Platforms
Are you constantly struggling with getting your photos to look their best on different platforms? Well, look no further! In this section, we will explore the key aspects of understanding export settings for different platforms, specifically focusing on lightroom. With a few simple adjustments, you can ensure that your photos will look stunning and eye-catching across various online platforms.
Customizing Image Size And Resolution
One of the crucial elements to consider when exporting your photos is the image size and resolution. Each platform has its own specific requirements, and tailoring your export settings accordingly can make a significant difference in how your photos appear online.
Here’s what you need to keep in mind:
- Determine the specific platform you will be uploading your photos to. Whether it’s for social media platforms like instagram and facebook, or for your website, understanding the recommended image size and resolution is key.
- Adjust the image size to fit the platform’s requirements. This ensures that your photos display optimally, without any unnecessary cropping or loss of detail.
- Consider the file size limitations of each platform and optimize your images accordingly. Smaller file sizes not only load faster but also keep your audience engaged, preventing them from abandoning your site due to slow loading times.
Choosing The Right File Format
The file format in which you export your photos can greatly impact the overall quality and appearance of your images on different platforms. Here’s what you need to know:
- Jpeg: This is the most commonly used file format for web and social media. It provides a good balance between image quality and file size, making it ideal for faster loading times without compromising visual appeal.
- Png: If you require transparency in your images or need to preserve higher detail, consider exporting in png format. This format is especially useful for graphics and logos, but keep in mind that it often results in larger file sizes.
- Raw: When exporting photos for professional printing or editing purposes, exporting in raw format is recommended. This format retains the highest level of image quality and allows for more flexibility in post-processing.
Color Space And Profile
To ensure accurate color representation across different platforms and devices, it is important to consider the color space and profile settings during the export process. Here’s what you need to keep in mind:
- Srgb: This is the most widely used color space for online platforms and most consumer devices. It ensures consistent and accurate colors when viewed on various screens.
- Adobe rgb: If you are exporting images for professional printing or print-specific platforms, using the adobe rgb color space may provide a wider gamut of colors. However, be aware that not all devices support this color space, which may result in color discrepancies.
- Export with embedded color profiles: By embedding color profiles such as srgb or adobe rgb in your exported images, you can maintain color accuracy and prevent color shifts when viewed on different devices.
With these key points in mind, you now have a solid understanding of export settings for different platforms in lightroom. By customizing image size, choosing the right file format, and considering color space and profiles, you can ensure that your photos look their best no matter where they are viewed.
Take your photography to the next level and showcase your talent with stunning, flawlessly optimized images!
B. Using Watermarking To Protect Your Images
Photo editing is an essential step in the process of enhancing and perfecting your images. While there are many tools available for photo editing, lightroom stands out as a powerful and versatile software with a wide range of features to elevate your photography.
In this blog post, we will explore one of the key aspects of photo editing in lightroom – using watermarking to protect your images from unauthorized use. With the increasing prevalence of online image sharing and the potential for copyright infringement, it is crucial to safeguard your work and ensure that proper credit is given to you as the photographer.
So, let’s delve into the details and learn how to effectively use watermarking in lightroom.
Key Points For Using Watermarking In Lightroom:
- Applying a watermark not only protects your images but also helps promote your brand and establish your identity as a photographer.
- By adding your logo or name as a watermark, you can ensure that viewers recognize your work even when it is shared on various platforms or websites.
- This can be particularly useful in preventing unauthorized use or distribution of your images.
- Lightroom offers a seamless and efficient process for creating and applying watermarks to your photos.
- You can easily customize the appearance, size, and position of the watermark according to your preferences.
- Lightroom’s built-in watermarking feature allows you to save your watermark settings as presets, making it convenient to apply them consistently across multiple images.
- It is essential to strike a balance between the visibility of your watermark and the overall aesthetics of your image.
- Position the watermark strategically in an area that does not distract from the main subject but is still visible enough to discourage misuse.
- Adjust the opacity of the watermark to ensure it is noticeable without overshadowing the image itself.
- In addition to protecting your images, watermarking can also serve as a means of branding and marketing.
- Use your watermark as an opportunity to showcase your style, signature, or website address, increasing your exposure and driving traffic to your portfolio or website.
- Create a visually appealing and consistent watermark that aligns with your overall branding to reinforce your professional image.
- Remember to strike a balance between watermarking your images for protection and allowing viewers to appreciate the full beauty of your work.
- Avoid excessive or overly intrusive watermarks that take away from the impact of your photographs.
- Experiment with different styles and positions to find the right balance that preserves the integrity of your images while safeguarding your rights.
By utilizing watermarking features in lightroom, you can protect your images, establish your brand, and ensure proper recognition for your work. Take advantage of this powerful tool to secure your digital assets and maintain control over their usage. So, let’s dive into the world of watermarking in lightroom and elevate your photography journey to new heights.
C. Syncing Edits Across Multiple Devices
Have you ever been frustrated by the tedious process of editing your photos on different devices? With adobe lightroom, syncing edits across multiple devices has never been easier. Whether you’re using your computer, smartphone, or tablet, you can seamlessly access and edit your photos with just a few simple steps.
Let’s explore how you can sync your edits effortlessly and ensure consistency across all your devices.
Syncing Your Edits:
- Enable sync: To begin syncing your edits, make sure you have the sync feature enabled on all your devices. This will allow lightroom to automatically update your edits across all platforms.
- Connect your devices: Ensure that all your devices are connected to the same adobe creative cloud account. This will establish a seamless connection and enable the syncing of your edits.
- Edit on any device: No matter if you start editing on your computer and later switch to your smartphone or tablet, lightroom will automatically sync all your changes. This allows you to pick up where you left off, regardless of the device you’re using.
- Preserve your edits: Lightroom stores your photo edits in the cloud, so you never have to worry about losing your work. Even if you lose or switch devices, your edits will be preserved and readily available once you log in to lightroom on the new device.
- Real-time updates: When editing on multiple devices, the changes you make on one device will be updated in real-time on all the others. This means you can instantly see the effects of your adjustments, helping you fine-tune your edits more efficiently.
- Selective syncing: If you have a large photo library and don’t want to sync all your images, lightroom allows you to select specific albums or folders to sync. This gives you greater flexibility and control over the syncing process.
Now you have the knowledge and tools to easily sync your photo edits across multiple devices using adobe lightroom. Enjoy the convenience and flexibility that this feature provides, and never miss a beat when it comes to perfecting your photography.
D. Sharing Your Photos Directly From Lightroom
Lightroom not only allows you to enhance and perfect your photos, but it also offers a convenient way to share your work with others directly from the software. Utilizing lightroom’s built-in features, you can effortlessly showcase your stunning images across various platforms.
Whether you want to share your photos on social media, send them to clients, or publish them on a website, lightroom has got you covered. Here’s how you can easily share your photos directly from lightroom:
Exporting Your Photos
- Select the desired photos: Choose the images you want to share by selecting them in the library module.
- Go to the export dialog: Navigate to the file menu and select “export.” This will open the export dialog box.
- Adjust export settings: Customize the export settings according to your preferences. You can choose the file format, image quality, image size, and even add watermarks if needed.
- Specify the destination folder: Select the folder location where you want to save the exported photos.
- Rename and organize files: Lightroom allows you to rename your files during export. You can also choose to organize them into subfolders for better management.
- Export the photos: Click on the “export” button, and lightroom will process and save your images as per the specified settings.
Publishing To Social Media Platforms
- Set up social media accounts: Connect your social media profiles within lightroom by accessing the publish services panel.
- Configure sharing settings: Customize the sharing settings specific to each platform. You can choose which collections to publish and set up publishing presets for future use.
- Publish your photos: Select the images you want to share and simply drag them into the designated collection. Lightroom will automatically publish them to the connected social media platforms.
Emailing Your Photos
- Select the photos to email: Choose the images you wish to send by selecting them in the library module.
- Go to the email dialog: Navigate to the file menu and select “email photo.” This will open the email dialog box.
- Compose the email: Fill in the recipient’s email address, subject line, and compose a message to accompany your photos.
- Customize export settings: Configure the export settings specific to email attachments, such as image size and quality.
- Send the email: Click on the “send” button, and lightroom will create an email with the selected photos attached.
With lightroom’s seamless sharing capabilities, you can effortlessly display your photographic masterpieces to the world. Whether you’re a professional photographer or an enthusiastic hobbyist, sharing your photos directly from lightroom is a breeze. Take advantage of these features to showcase your creativity and build an impressive online presence.
E. Creating Slideshows And Photo Books In Lightroom
Creating Slideshows And Photo Books In Lightroom
Capturing memories through photography is a beautiful way to relive special moments. And with adobe lightroom, you can take your photographs to the next level by creating stunning slideshows and photo books. Whether you want to showcase your work to clients, share family vacation photos, or create a personalized album, lightroom has all the tools you need.
Slideshows:
- Create a captivating slideshow with lightroom’s intuitive interface.
- Customize your slideshow by selecting the images you want to include.
- Add creative transitions and effects to enhance the visual appeal.
- Include background music or audio narration to set the mood.
- Adjust the timing and pacing of your slideshow for a seamless viewing experience.
Photo Books:
- Transform your photos into a professionally designed photo book.
- Choose from a variety of templates to find the perfect layout for your story.
- Customize each page with your preferred images and text.
- Experiment with different fonts and colors to match your style.
- Order high-quality prints of your photo book directly from lightroom.
With lightroom’s extensive editing capabilities, you can edit your photos to perfection before adding them to your slideshows or photo books. From adjusting exposure and color to removing unwanted objects, lightroom provides the necessary tools to create stunning visual narratives.
Unleash your creativity and showcase your photography skills with lightroom’s slideshow and photo book features. Whether for personal or professional use, these tools will surely leave a lasting impression on your audience. So start exploring lightroom today and let your photographs tell their own stories.
A. Recap Of The Importance Of Photo Editing In Lightroom
Photo editing plays a vital role in enhancing the quality and visual impact of your photographs. With the ever-evolving technology in photography, lightroom has become an essential tool for photographers of all levels. In this blog post, we will recap the importance of photo editing in lightroom and how it can elevate your images to another level.
So, let’s dive in and explore the key benefits of using lightroom for photo editing.
A. Enhancing Exposure And Colors:
- Adjusting exposure: Lightroom allows you to fine-tune the exposure of your photos, making them brighter or darker as needed.
- Balancing colors: With the color correction tools, you can achieve accurate and vibrant colors, bringing life to your images.
B. Correcting White Balance:
- Fixing white balance: Lightroom offers an array of tools to correct the white balance in your photos, ensuring that the colors appear natural and balanced.
- Tackling different lighting conditions: Whether you’re dealing with harsh daylight or a dimly lit room, lightroom allows you to adjust the temperature and tint to achieve the desired look.
C. Enhancing Details And Sharpness:
- Sharpening images: Lightroom’s sharpening tools enable you to enhance the details and ensure your photos look crisp and clear.
- Reducing noise: If your photos have noise or grain, lightroom’s noise reduction feature can help smoothen the image while retaining important details.
D. Creative Control With Presets:
- Applying presets: Lightroom offers a wide range of presets that allow you to instantly apply different styles and moods to your photos.
- Customizing presets: You can also create and save your own presets, giving you the freedom to develop a consistent visual style.
E. Non-Destructive Editing:
- Maintaining the original image: One of the significant advantages of lightroom is non-destructive editing, which means your original photo remains untouched.
- Reverting changes: You can always go back to the original image or make adjustments to your edits without compromising the quality or integrity of the photo.
F. Streamlined Workflow:
- Efficient organization: Lightroom enables you to import, organize, and categorize your photos, making it easier to manage large collections.
- Batch editing: With lightroom’s batch editing capabilities, you can save time by applying the same edits to multiple photos simultaneously.
By utilizing lightroom for photo editing, you can unleash your creative vision, enhance the overall quality of your images, and establish a unique photographic style. So, whether you’re a professional photographer or an enthusiast, consider incorporating lightroom into your workflow and take your photos to new heights.
B. Encouragement For Continuous Learning And Experimentation With Lightroom.
Encouragement For Continuous Learning And Experimentation With Lightroom
Lightroom is a powerful tool that allows photographers to enhance and manipulate their images, but mastering it can be a journey. Don’t be discouraged if you’re not an expert right away! Experimenting and continuously learning new techniques in lightroom is key to improving your editing skills and achieving the desired effects.
So, let’s dive into some tips and tricks that will encourage you to keep exploring and pushing the boundaries of lightroom:
Keep Up With The Latest Updates And Features:
- Stay informed about the latest lightroom updates and new features. Adobe constantly releases improvements and additions that can enhance your editing workflow and open up new possibilities.
Utilize Online Resources And Communities:
- Join online communities, forums, and social media groups dedicated to lightroom. This will provide you with a platform to connect with other photographers, share your work, and learn from their experiences.
- Take advantage of the vast number of tutorials available online. Many experienced photographers and experts in lightroom share their knowledge through video tutorials, blog posts, and step-by-step guides. These resources can give you insights into new techniques and inspire your creativity.
Take On Editing Challenges:
- Don’t hesitate to challenge yourself with different editing styles and techniques. Experiment with various presets, brushes, and adjustment tools to understand their impact on your images. Embrace the trial and error process and push yourself out of your editing comfort zone.
Work On Different Types Of Photos:
- Edit a diverse range of subjects and genres to expand your editing expertise. Whether it’s landscapes, portraits, or still life, each type presents unique challenges and opportunities for creativity. This diversified approach will help you develop a well-rounded editing skill set.
Learn From Your Favorite Photographers:
- Study the work of photographers you admire and try to replicate their editing style. Analyze their compositions, color choices, and overall aesthetic. By studying and emulating their techniques, you can gain insights into their editing process and develop your own signature style.
Practice, Practice, Practice:
- The more you practice editing in lightroom, the more comfortable and proficient you will become. Dedicate regular time to editing your photos, even if it’s just a few minutes each day. Consistency is key when it comes to mastering any skill.
Remember, editing in lightroom is a continual learning process. Stay curious, explore new techniques, and don’t be afraid to make mistakes. With each new editing session, you’ll gain valuable experience and progress on your journey towards becoming a proficient lightroom user.
So, keep experimenting and never stop learning!
Frequently Asked Questions For Photo Editing Tips Lightroom
What Are Some Basic Photo Editing Tips For Lightroom?
To get started with photo editing in lightroom, adjust the exposure, contrast, and white balance for a balanced look. Use the crop tool to frame your image, and experiment with different filters and presets for creative effects. Don’t forget to save your edits and export the final image in a suitable format.
How Can I Enhance The Colors Of My Photos In Lightroom?
In lightroom, you can enhance the colors of your photos by adjusting the vibrance and saturation sliders. Be careful not to overdo it, as it can result in unnatural-looking colors. Use the hsl panel to selectively modify specific colors, and consider using split-toning to add a subtle tint to your images.
What Are Some Tips For Retouching Portraits In Lightroom?
When retouching portraits in lightroom, start by using the spot removal tool to remove blemishes and unwanted distractions. Soften the skin using the adjustment brush with the clarity and sharpness sliders adjusted downwards. Adjust the tone curve to fine-tune the overall look, and use the graduated filter to enhance the background while keeping the subject in focus.
Conclusion
To sum up, these lightroom photo editing tips can greatly enhance your editing skills and give a professional touch to your photographs. By applying the right adjustments to exposure, contrast, and white balance, you can transform your images into stunning masterpieces.
Utilizing the power of color correction, noise reduction, and sharpening techniques will further enhance the overall quality of your photos. Additionally, don’t forget to experiment with presets and filters to create unique and vibrant effects. Remember to maintain a consistent style and aesthetic throughout your edits, and always strive for a natural and authentic look.
With practice and patience, you’ll become more proficient in navigating through lightroom’s features and achieving the desired results. So, embrace these tips, unleash your creativity, and watch your photos come alive with professional editing techniques.