

Creating a transparent background in Photoshop is one of the most useful skills for photographers, graphic designers, online sellers and digital marketers. A transparent background lets you place an image on any website, design or marketing material without leaving an unwanted white or colored box around the subject. Whether you are editing product photos for an ecommerce store, designing a logo or creating graphics for social media .
In this step by step guide you will learn the easy and most effective ways to make a transparent background in Photoshop using the latest tools available in 2026. We will cover beginner friendly options like the Remove Background tool as well as more precise methods such as Select Subject, Layer Mask, Pen Tool and Magic Wand Tool. You will also learn how to save your image with transparency avoid common mistakes and understand when AI background removal works well and when manual editing delivers better results. By the end of this guide you will have the confidence to create high quality transparent images for any project.
Top 5 Methods to Make Transparent Background in Photoshop
Photoshop offers several ways to create a transparent background and the right method depends on the type of image . Some tools work best for simple backgrounds while others deliver more accurate results for complex subjects like hair, products or logos. In this guide we will walk through the five most effective Photoshop methods explaining when to use each one and how to achieve clean professional looking transparent images with ease.
A. Remove Background Tool
The Remove Background tool is the fastest way to make a transparent background in Photoshop. It uses Adobes AI technology to detect the main subject and remove the background with a single click. This method is perfect for beginners and works well with product photos, portraits and simple backgrounds. After removing the background you can refine the edges and save the image as a transparent PNG.
Step- 1
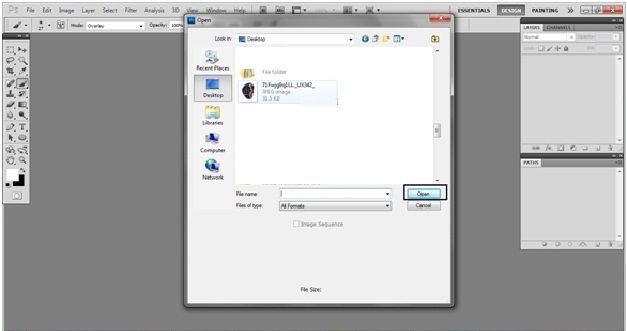
The first step is to open the photo of the product on the Photoshop application on your PC. CLICK the file option on the upper TAB of Photoshop, choose the OPEN option on the menu or press (Ctrl+O)
Step- 2
In this step choose the Product photo you want to make the background transparent of. An option will open in the screen from where you can choose the file from your PC. Choose the file and CLICK OPEN.

Step- 3
Next step is to choose the magic wand tool from the toolbar. To choose the magic wand tool, CLICK the Magic wand tool option from the left TOOLBAR.

Step- 4
After selecting the Magic wand tool you have to click the background you want to remove. The Magic want tool selects the color that matches the selection. So, CLICK the White color background behind the product. Here, I am using the watch as my product.

Step- 5
After selecting the white background, you can see that the selection is being shown by dotted lines. It is around the watch which means it has selected the white background. So you have to select the watch to remove its background. To do so CLICK the right button of the mouse then you will see an option on the screen. Then click the INVERSE SELECTION option. Your product photo will get selected this way.

Step- 6
After selecting the inverse your product photo will be selected. Then, again CLICK the right button of the mouse and select LAYER VIA COPY option from the menu. This way you will find a new layer available in your layer tab. That layer will be the transparent background layer.

Step- 7
The last step is to choose the background layer from the layer TAB and CLICK the right button of the mouse. Then, select the DELETE option from the menu. Your old background will be removed and you will now have a new transparent background for your product.

Step- 8
In the end CLICK the File option from the upper TAB and select the save as option or use (Ctrl+Shift+s). Choose the specific folder you want the photo to be saved in. Finally your photo with a transparent background will be saved.
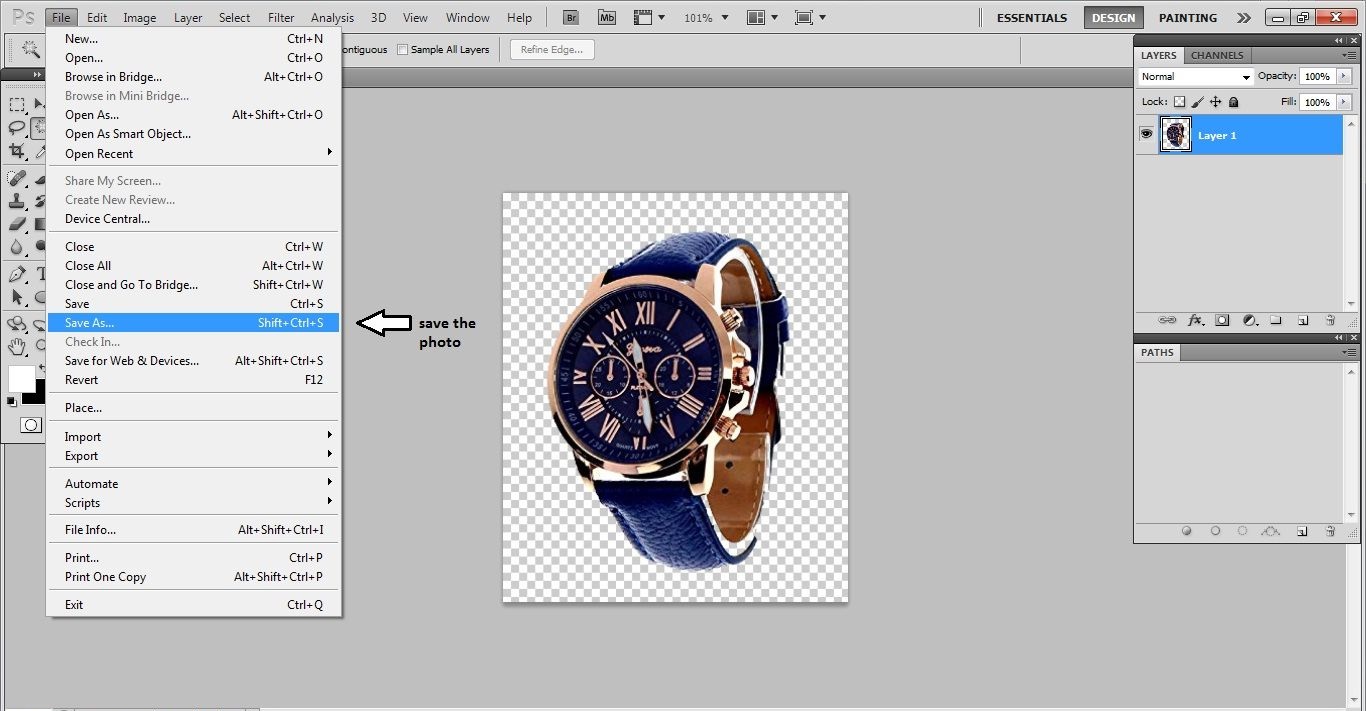
By following these simple steps you can make the background of your product’s image transparent. Then you can also post attractive photos of your product in different websites and can increase the turnover of your business by provoking lots of customers.
B: Select Subject + Layer Mask
The Select Subject and Layer Mask method gives you more control than the Remove Background tool. Photoshop automatically detects the main subject, while the layer mask lets you make non-destructive edits. This technique is ideal for portraits, pets and images with detailed edges because you can refine the selection without permanently removing any part of the image.
Step 1: Select Subject
Open your image and make sure the image layer is selected. Go to Select > Subject and Photoshop will automatically detect and select the main subject. Review the selection to ensure it covers the entire object.
Step 2: Add a Layer Mask
With the subject still selected click the Add Layer Mask button at the bottom of the Layers panel. Photoshop hides the background and creates a transparent background while keeping the original image safe inside the mask.
Step 3: Refine Hair
If your subject has hair, fur or other fine details click Select and Mask from the top menu. Use the Refine Hair option or the Refine Edge Brush Tool to recover natural-looking strands and improve the selection.
Step 4: Use the Brush Tool
Select the Brush Tool (B) and paint with black to hide unwanted areas or white to reveal parts of the subject. This makes it easy to fix small mistakes without damaging the original image.
Step 5: Clean Up the Edges
Zoom in and inspect the entire outline of your subject. Remove any remaining halos, rough edges or background fragments using the mask and brush. A clean edge gives your transparent background .
C: Pen Tool for Perfect Cutouts
The Pen Tool is the most accurate method for creating a transparent background in Photoshop. It allows you to draw a precise path around your subject making it the preferred choice for professional photo editing. Although it takes more time than automatic tools, it delivers clean, smooth edges that are ideal for product photography, logos and other images with sharp outlines.
Step 1: Create a Path
Select the Pen Tool (P) from the toolbar. Carefully click around the edges of your subject to create anchor points and draw a smooth path. Take your time to follow the outline as accurately as possible.
Step 2: Convert the Path to a Selection
After completing the path right click anywhere on it and choose Make Selection. Set the Feather Radius to 0.5–1 pixel for smooth edges, then click OK to convert the path into a selection.
Step 3: Add a Layer Mask
With the subject selected click the Add Layer Mask button at the bottom of the Layers panel. Photoshop hides the background while preserving the original image allowing you to make edits later if needed.
Best for Product Images
The Pen Tool is the top choice for ecommerce product photos, including clothing, shoes, electronics, furniture, jewelry and other items that require clean, accurate edges. It creates professional cutouts that meet marketplace image standards.
Best for Logos
This method is also ideal for logos, icons, signs, packaging and other graphic elements with straight lines or smooth curves. The precise path helps maintain sharp edges and produces a high quality transparent background.
D: Magic Wand Tool
The Magic Wand Tool is a quick and easy way to make a transparent background in Photoshop when your image has a solid color background especially white. It selects pixels with similar colors making background removal fast and simple. While it is not the best choice for complex images it works well for product photos with clean studio backgrounds.
Step 1: Adjust the Tolerance
Select the Magic Wand Tool (W) from the toolbar. In the options bar set the Tolerance between 20 and 40. A lower value selects similar colors while a higher value selects a wider color range.
Step 2: Enable Contiguous
Check the Contiguous option before making your selection. This ensures Photoshop selects only the connected background area instead of similar colors found throughout the entire image.
Step 3: Turn On Anti-Alias
Enable Anti-alias to create smoother selection edges. This helps reduce jagged outlines and gives your transparent background a cleaner more professional appearance.
Step 4: Delete or Mask the Background
Click on the background to select it. If needed hold Shift to add more areas to the selection. Press Delete to remove the background or click Add Layer Mask for a non-destructive edit that you can adjust later.
Best for White Backgrounds
The Magic Wand Tool works best with white or other solid color backgrounds that have a clear contrast with the subject. It is a great option for simple product photos, documents and basic graphics where speed is more important than detailed edge refinement.
How to Save an Image with Transparency
After removing the background choosing the right file format is essential to preserve transparency. Not every image format supports transparent backgrounds . So saving your file correctly ensures it looks clean on websites, social media and design projects. Below are the best file formats to use in Photoshop.
- PNG
- WebP
- PSD
- TIFF
Common Mistakes to Avoid
Removing a background in Photoshop may look simple but small mistakes can reduce the quality of your final image. Poor edges, incorrect file formats or losing important details can make your transparent image look unprofessional. Avoiding these common mistakes will help you create cleaner cutouts with smooth edges and better results.
- Saving as JPG
- Forgetting to unlock the layer
- Not refining hair
- Using low-resolution images
- Deleting instead of masking
- Jagged edges
- Exporting incorrectly
AI vs Manual Background Removal
When creating a transparent background you can choose between AI background removal tools and manual Photoshop techniques. AI tools make the process faster by automatically detecting and removing backgrounds while manual editing gives you more control over every detail. The right choice depends on your image type, editing requirements and the level of accuracy you need.
| Feature | AI Background Removal | Manual Photoshop Background Removal |
| Speed | Very fast and removes backgrounds within seconds | Takes more time because every detail needs attention |
| Accuracy | Good for simple images but may miss complex details | Highly accurate with full control over selections |
| Hair & Fine Details | May struggle with hair, fur and small edges | Provides better results with Select and Mask and Brush Tool |
| Editing Control | Limited customization after automatic removal | Complete control using masks, paths and selections |
| Best For | Quick edits, simple products, bulk processing | Professional editing, ecommerce, portraits and complex images |
| Skill Level | Beginner friendly | Requires Photoshop knowledge and practice |
| Consistency | Results may vary depending on image quality | Produces consistent results with proper techniques |
| File Quality | Depends on the tool and export settings | Maintains high-quality results with proper Photoshop workflow |
| Common Tools | Remove.bg, Adobe Express, AI background removers | Pen Tool, Layer Mask, Select Subject, Magic Wand Tool |
FAQ
How do I make a transparent background in Photoshop?
To make a transparent background in Photoshop, open your image, remove the background using tools like Remove Background, Select Subject, Pen Tool or Magic Wand Tool .Then save the file as PNG to preserve transparency.
Which Photoshop tool is best for removing a background?
The best Photoshop tool depends on your image type. The Remove Background tool is best for quick edits Pen Tool is ideal for professional product cutouts and Select Subject with Layer Mask works well for portraits and complex subjects.
How do I save an image with a transparent background in Photoshop?
After removing the background, go to File > Export > Export As choose PNG format and make sure the Transparency option is enabled before exporting your image.
Why is my transparent background showing white in Photoshop?
A transparent background may appear white if the layer is locked . The transparency preview is disabled or the file was saved in a format like JPG that does not support transparency.
Can I make a JPG image background transparent in Photoshop?
Yes you can remove the background from a JPG image in Photoshop but you cannot save transparency in JPG format. You need to export the final image as PNG, WebP, PSD or TIFF.
What is the easiest way to remove a background in Photoshop?
The easiest method is using the Remove Background tool in the Properties panel. Photoshop automatically detects the subject and removes the background with one click.
How do I remove a white background and make it transparent in Photoshop?
You can remove a white background using the Magic Wand Tool, Select Subject or Remove Background tool. After selecting the background, delete it or apply a layer mask and save the image as PNG.
How do I make hair edges look natural after removing a background?
Use Select and Mask with the Refine Edge Brush Tool to improve hair and fine details. Adjust edge settings carefully to create a more natural cutout.
Is AI background removal better than manual Photoshop editing?
AI background removal is faster and useful for simple images but manual Photoshop editing provides better accuracy and control for complex images like hair, jewelry, fashion products and detailed objects.
Why should I use a layer mask instead of deleting the background?
A layer mask keeps your original image safe and allows you to make changes later. Deleting the background permanently removes pixels and makes future editing difficult.
What file formats support transparent backgrounds?
The most common formats that support transparency are PNG, WebP, PSD and TIFF. JPG files do not support transparent backgrounds.
How do I fix rough edges after removing a background in Photoshop?
You can fix rough edges by using Select and Mask, Smooth, Feather, Contrast adjustments and the Brush Tool to clean and refine the selection.
Can Photoshop automatically remove backgrounds?
Yes, Photoshop has an automatic Remove Background feature that uses AI technology to detect the main subject and separate it from the background.
What image resolution is best for background removal in Photoshop?
High resolution images provide better results because Photoshop can detect edges and small details more accurately. Low resolution images often create rough or pixelated cutouts.
How do I create a transparent background for ecommerce product photos?
For ecommerce images use the Pen Tool or Select Subject with Layer Mask to create clean edges remove the background and export the final image as PNG or WebP.
Conclusion
Make a transparent background in Photoshop becomes easy when you understand the right tools and techniques. Whether you use the quick Remove Background tool, accurate Pen Tool, flexible Layer Mask or simple Magic Wand Tool . Each method has its own advantages depending on the type of image you are editing.
For professional results always focus on clean edges, proper selection and the correct export format. Saving your final image as PNG, WebP, PSD or TIFF will help maintain transparency without losing quality. While AI tools can speed up the process manual Photoshop editing still provides the highest level of control for complex images. Following these steps and avoiding common mistakes you can create high quality transparent images for ecommerce, photography, branding and digital design projects.