

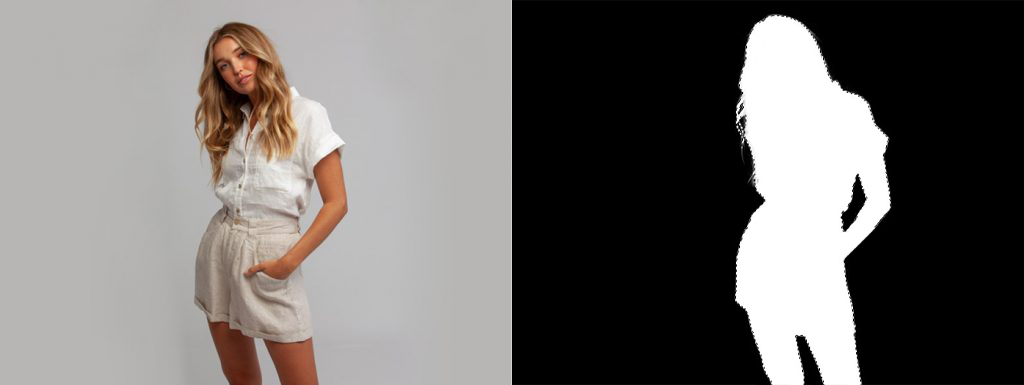
In other words the masked area is protected and will not be changed by any editing tools used in post-processing .
Image masking is a photo editing method that helps hide or show specific parts of an image without removing them permanently. It is mainly used to remove or change backgrounds, fix edges and improve image quality. This technique is important for creating clean, professional looking photos especially for eCommerce, fashion and product photography. Through image masking editors can focus attention on the main subject, handle complex edges like hair or transparent fabric, and make every picture look sharp and natural. Whether you are working with product catalogs or marketing images . Image masking plays a key role in achieving high-quality results.
Masking is a powerful tool that can be used for many different purposes. In some cases, it can be used to make global changes to an image. In other cases, it can be used to target specific areas for more detailed editing.
In the next section, we will take a closer look at some of the ways that masking can be used to improve your images.

Guide to Image Masking for Photo Editing
Image masking is the process of hiding or revealing parts of an image. This can be done to focus on a particular subject or to make selective adjustments to an image. Several techniques can be used for image masking, and each has its advantages and disadvantages.
One of the simplest types of image masking is selection masking. With this technique, you use a selection tool to select the area of the image that you want to keep. The rest of the image is hidden or masked out. Selection masks are easy to create and can be used for basic adjustments, such as brightness and contrast.
Why is it necessary to mask images?
Answer: It is necessary to mask images because without masking, they can be easily identified and traced back to the source.
Masking an image means adding random noise or distortion to it so that it cannot be recognized or traced back to the original. This is done for a variety of reasons, such as security or privacy, but the most common reason is to protect copyright. By adding noise or distortion, it makes it more difficult for someone to copy or steal the image and claim it as their own.

Tools and Software Used
Using the right tools makes image masking faster, easier and more precise. These software programs help create clean edges, detailed selections and professional-quality images for products, marketing and creative projects.
- Adobe Photoshop
- GIMP
- Canva Pro
- Adobe Lightroom
- CorelDRAW
- Affinity Photo
- PaintShop Pro
Types of image masking in post-processing
If you are looking to improve your photo editing skills, learning how to use image masking is a must. This technique can be used for selective edits, which makes the process much easier and more efficient. There are different types of image masking, depending on the software you have. In this comprehensive guide, we will teach you everything you need to know about image masking and how to use it effectively!
1. Layer Masks
Layer masks are one of the most versatile tools in Photoshop. They allow you to selectively edit parts of a layer without affecting the rest of the image.
Layer masks are created by adding a mask to a layer. This can be done by clicking the “Add Layer Mask” button at the bottom of the Layers panel.
Once you have added a layer mask you can paint it with black, white and shades of gray. Black paint will hide the contents of the layer, white paint will reveal it, and shades of gray will allow different levels of transparency.

2. Clipping Mask
What we do in a clipping mask is to hide the content of the layer, and what will be visible is the layer that is below it.
One important use for clipping masks is when you have a type of logo that you want to place on top of an image. You can create a clipping mask from the type or logo layer and then place the image layer underneath. The clipping mask will cause the image to show through the type or logo. This is a quick and easy way to create a professional-looking composite image.
There are many other uses for clipping masks. They can be used to create photo collages, add texture to an image, or even change the color of an image. Clipping masks are a versatile tool that every Photoshop user should be familiar with.

3. Alpha Channel Masking
Alpha channel masking is a process of creating an image mask from the transparency information in an image. When you create a layer mask, Photoshop stores the mask as grayscale values. The black areas of the mask are completely transparent and the white areas are completely opaque. Gray areas represent varying levels of transparency.
To create an alpha channel mask, you need to have an image with an alpha channel. An alpha channel is a type of mask that is used to store selections. When you make a selection in Photoshop, the area inside the selection is white and the area outside the selection is black. This black and white mask is called an alpha channel.
4. Vector Masking
Vector masking is a technique used in Photoshop to create clean and sharp edges around an object using vector paths. Unlike pixel based masking which works with shades of gray to hide or show parts of an image. Vector masking uses smooth paths made with the Pen Tool or Shape Tool. This makes it perfect for editing photos of products that have clear outlines, such as boxes, bottles, mobile phones or logos. The best part about vector masking is that it stays crisp even if you resize the image because vector paths are not affected by resolution. It is mainly used in eCommerce product editing, advertisement design, and any project that requires precise, professional cutouts with smooth and neat edges.
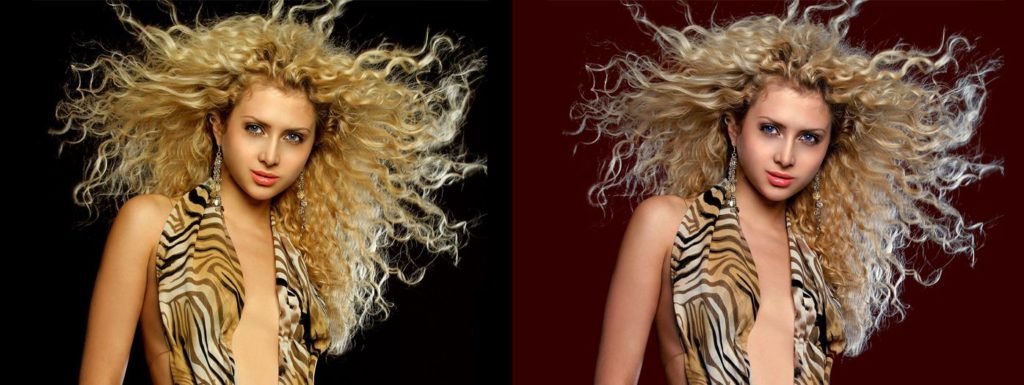
5. Transparent/Fur or Hair Mask
Transparent, fur and hair masking are advanced photo editing techniques used when an image has fine details or partially see-through areas that are difficult to cut out .
Transparent masking is used for objects like glass, water, smoke or thin fabric. These materials let light pass through them . So editors use soft brushes, layer adjustments and careful blending to keep natural transparency. This helps the object look real even when the background is changed or removed.
Fur and hair masking focuses on subjects with soft or thin edges, such as human hair, animal fur or feathers. Regular selection tools often fail here because the strands are too small or uneven. Using tools like the Refine Edge or Select and Mask in Photoshop, editors carefully separate each strand keep the texture and shape.
These techniques take more time and skill but they produce natural and results that make images look realistic and professional.
Who Needs Image Masking Services
Image masking services are essential for businesses and individuals who want their photos to look professional and polish. E-commerce brands often use masking to remove backgrounds from product photos, making them suitable for online catalogs and marketplaces.
Fashion and jewelry photographers rely on masking to highlight fine details like fabric texture or gemstone sparkle. Marketing agencies and photo studios use these services to create clean composite images, advertisements or social media visuals. Even bloggers and content creators benefit from image masking when they need their photos to have a consistent and visually appealing look. Essentially anyone who wants high-quality, detailed images that stand out can benefit from professional image masking services.
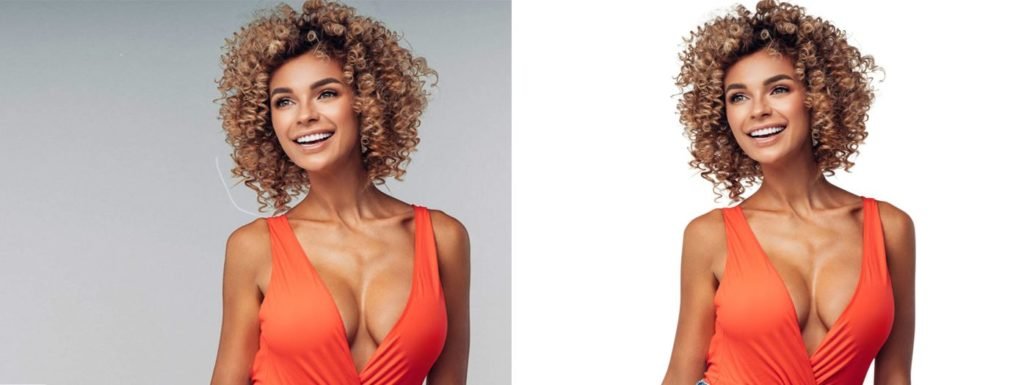
Before and After Example
Image masking makes photos look clean and professional by keeping the main subject and removing the background or distractions.

FAQ
What is image masking in photo editing?
Image masking is a non-destructive technique used to hide or reveal specific parts of an image. It allows for precise edits without permanently altering the original image make it ideal for tasks like background removal, selective adjustments and combining multiple images seamlessly.
What is vector masking in Photoshop?
Vector masking in Photoshop involves using paths or shapes to define which parts of a layer are visible. Unlike pixel-based masks, vector masks are resolution-independent and provide sharp, clean edges, making them perfect for images with geometric shapes or hard lines.
How do I create a vector mask in Photoshop?
To create a vector mask in Photoshop:
- Select the layer you want to mask.
- Use the Pen Tool or Shape Tool to create a path around the area you want to reveal.
- With the path selected, go to the Layers panel, click the “Add vector mask” button, or choose Layer > Vector Mask > Current Path.
- This will apply the vector mask, hiding the areas outside the path.
What is the difference between a layer mask and a vector mask?
A layer mask uses grayscale values to hide or reveal parts of a layer, allowing for soft transitions and detailed edits. A vector mask, on the other hand, uses paths to define visibility, resulting in sharp, clean edges and is resolution-independent.
Can I use both layer and vector masks on the same layer?
Yes, you can apply both types of masks to a single layer. This allows you to combine the precision of vector masks with the flexibility of layer masks, enabling complex and detailed edits.
What are some common uses of image masking?
Image masking is commonly used for:
- Removing or changing backgrounds in product photography.
- Creating composites by combining multiple images.
- Applying selective adjustments to specific areas of an image.
- Isolating subjects for focus or emphasis.
Is image masking the same as clipping mask?
No, while both involve hiding parts of a layer, they function differently. A clipping mask uses the content of one layer to mask the layers above it, whereas a vector mask defines visibility using paths on the same layer.
Can I edit a vector mask after creating it?
Yes, vector masks are editable. You can adjust the path using the Pen Tool, move the mask, or change its shape without affecting the image quality, thanks to their resolution-independent nature.
Conclusion
Image masking is a powerful tool that can be used for many different purposes. In some cases, it can be used to make global changes to an image. In other cases, it can be used to target specific areas for more detailed editing. By understanding the different types of image masking and the techniques involved, you can unlock a world of creative possibilities for your photos. Try experimenting with different masking techniques to see what works best for you. Happy editing!