

Today I will show you how to resize images without reducing resolution in Photoshop. Resizing an image can sometimes make it blurry or reduce important details. But you can avoid many of these problems with the right settings and simple techniques. In this guide you will learn some useful Photoshop tricks for keeping your images clear and sharp after resizing. I will also show you how to choose the right image size and keep the original proportions. These methods are useful for photographers and website owners. They can help you prepare images for websites. Ecommerce stores. Presentations. And other digital uses. So let’s look at the simple ways to resize your images while keeping their quality as high as possible.
Top 2 Ways to Resize Images Without Losing Quality
We will focus on only two simple methods. Both methods can help you resize images while keeping them clear and clean. The first method uses Photoshop. It gives you more control over the image size and quality. The second method uses AI tools. It can help when you need to enlarge a small image. We will explain both methods step by step. You will also learn when to use Photoshop and when an AI tool may be a better choice. These methods are useful for photographers and website owners. They can help you create professional-looking images for different needs.
Step 1. Resize Images in Photoshop
Photoshop is a popular tool for professional image resizing. It gives you better control over image size and quality. You can set the exact dimensions you need. With the right settings you can keep your image clear and sharp. This makes Photoshop a good choice for high-quality image resizing.
Open the image : Start Photoshop on your computer. Click File in the top menu. Select Open and find your image. Choose the image and click Open. Your photo will appear in Photoshop.
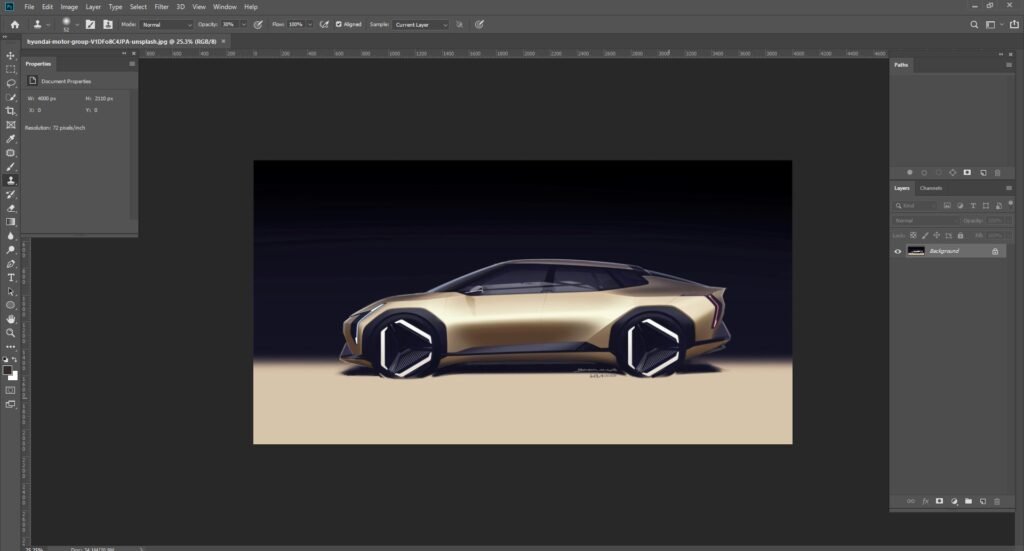
Go to Image > Image Size : After opening your image go to the Image menu at the top. Select Image Size. A new window will appear. Here you can see the current image dimensions. You can enter the width and height you need. This lets you resize the image for your specific use.
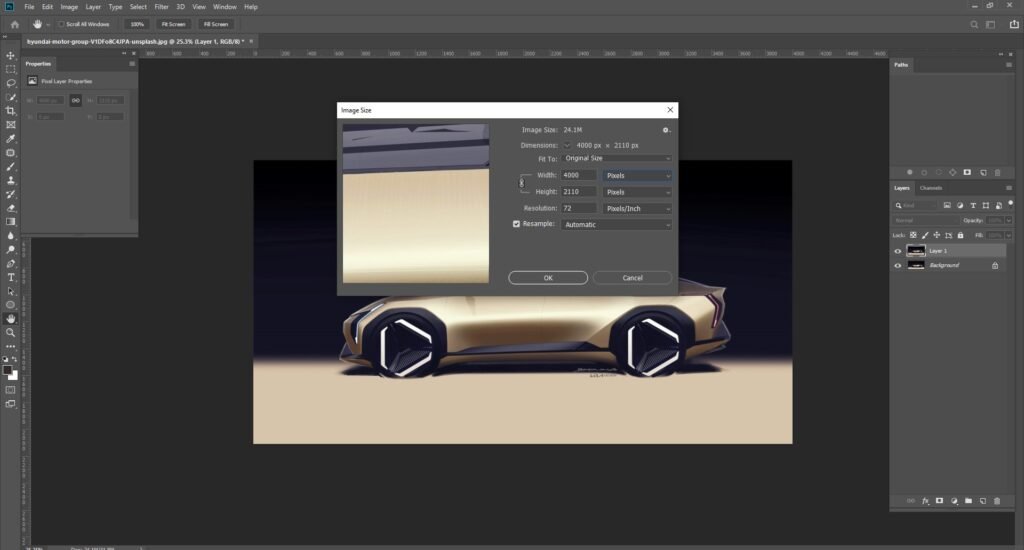
Enter the required size :After opening Image Size you will see the width and height of your photo. Enter the size you need for your work. Different platforms need different image sizes. A website may need a smaller image. Social media may need another size. Choose the right dimensions for your platform. Then check the preview before applying the changes.
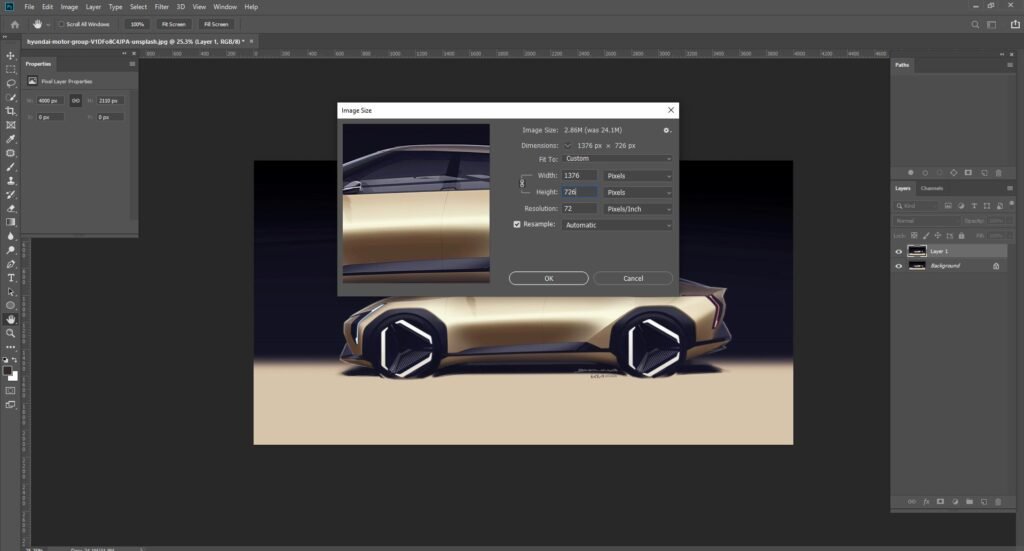
Keep the aspect ratio : Keep the aspect ratio locked before changing the image size. This keeps the width and height in the right proportion. Your photo will not look stretched or squeezed. Change one dimension and Photoshop will adjust the other. This helps your resized image look natural and professional.
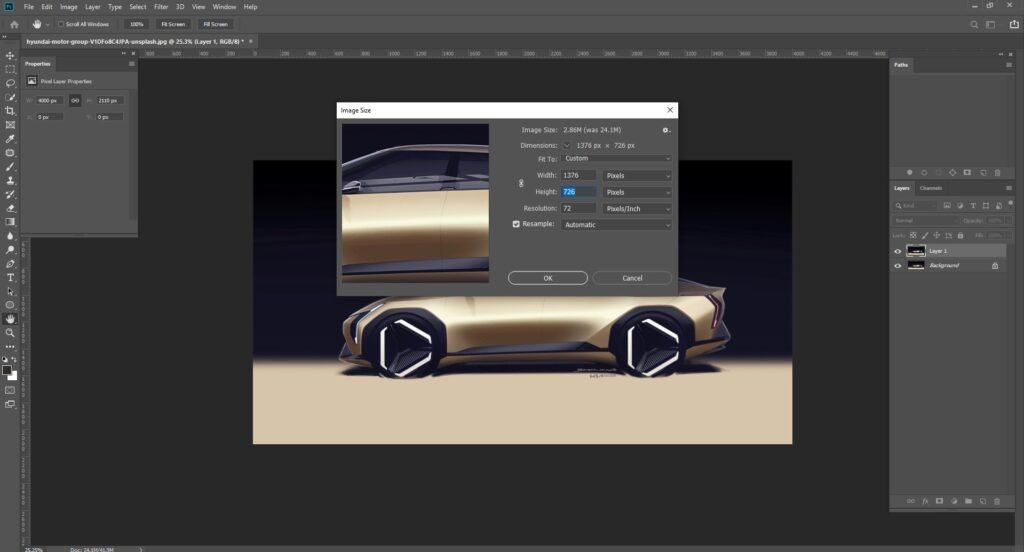
Choose the quality/resampling option : Choose the right resampling option before you resize the image. Photoshop uses this setting to adjust the pixels in your photo. After resizing zoom in and check the details. Look at the edges and small areas. If the image still looks clear and sharp you can use it.
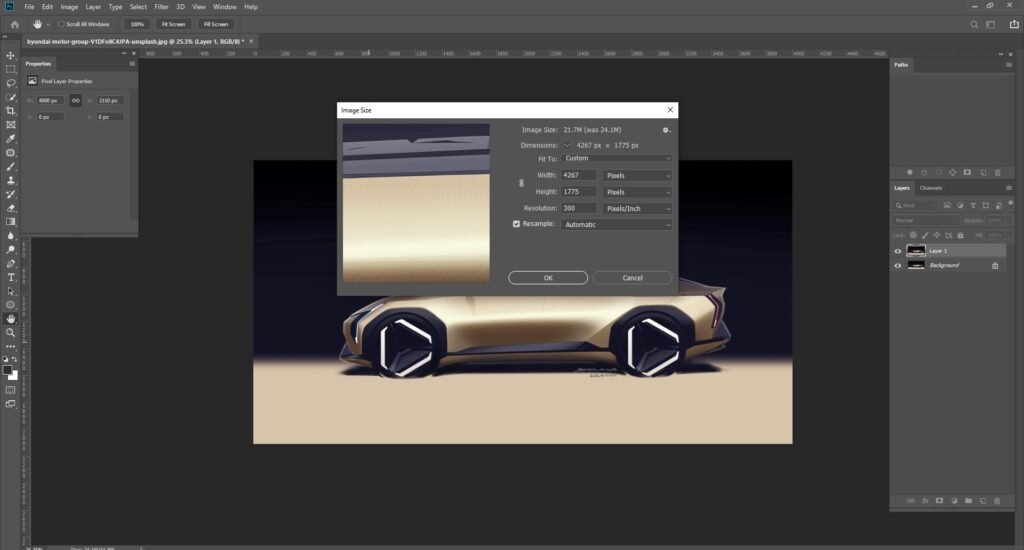
Preview the result : Before saving the image take a close look at the resized version. Zoom in and check the face. Look at the edges and fine details. Make sure the photo still looks clear and natural. If everything looks good you can move to the final step.
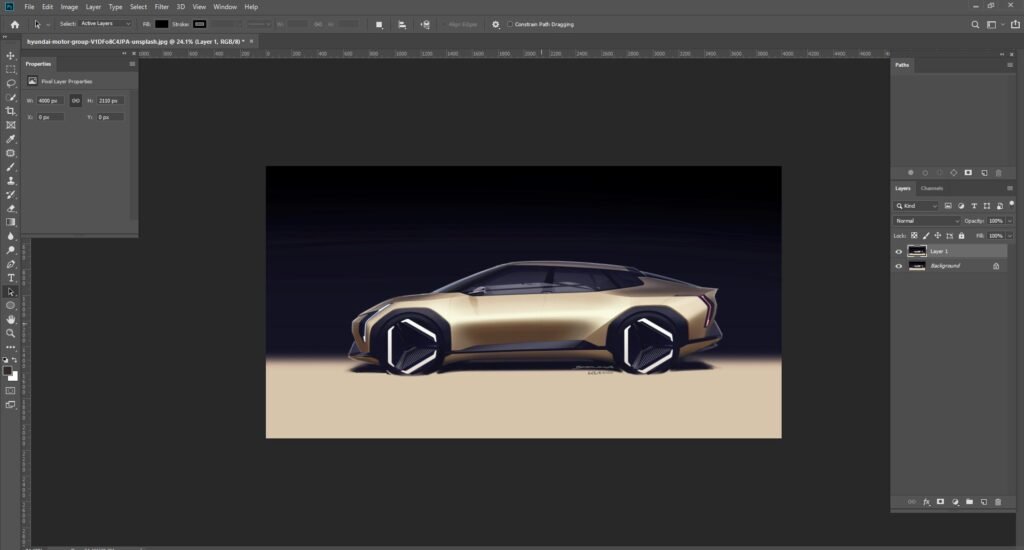
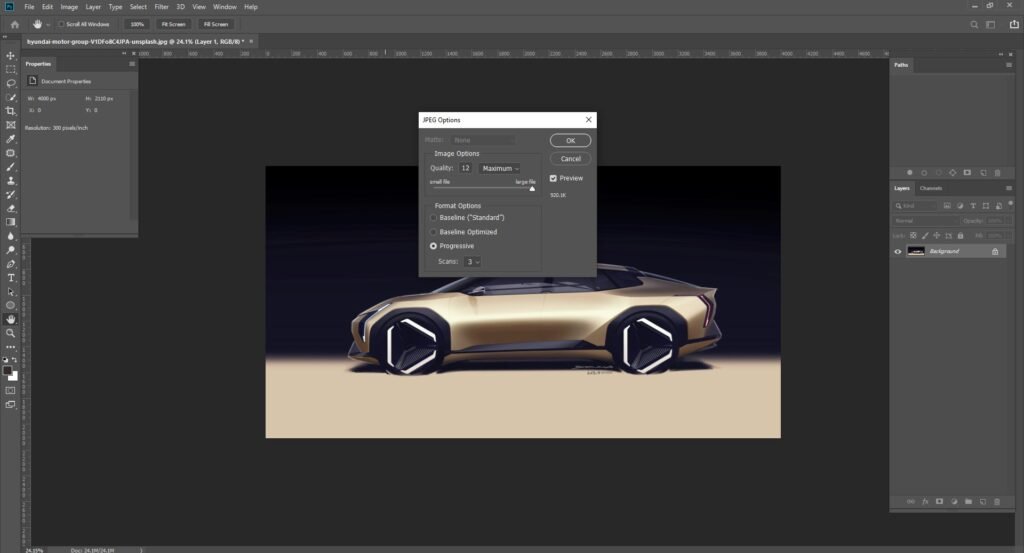
Save the image : When you are happy with the result save your resized image. Go to File > Save As or choose Export As. Select the right file format and save the image to your preferred folder. Check the final image once before using it.
2nd step: Resize Images With AI Tools
AI tools make image resizing easy. They are helpful when you need to make a small image larger. You can upload your photo and choose the size you want. The AI then resizes the image while trying to keep the details clear. After the process check the image closely. Look at the edges and small details. If the photo looks clear and sharp you can save it.
Steps:
Upload the image : Open an AI image resizing tool such as Adobe Firefly, Let’s Enhance, Upscale.media or Fotor. Look for the Upload button. Click it and choose your photo from your computer. Some tools also let you drag the image into the upload area. Wait until your image appears on the screen before moving to the next step.
Choose the resize or upscale option : After uploading your image look for the Resize or Upscale option. Choose Resize when you need a specific image size. Use Upscale when you want to make a small image larger. Enter the dimensions you need. Then check the available size options before starting the process.
Select the required size : Now choose the image size you need for your project. Enter the required width and height if the tool allows custom sizes. You can choose a smaller size for a website or a larger size for other uses. Check the proportions before moving to the next step.
Choose the quality setting : Image quality is important when you resize a photo for a website or social media. Check the quality options before processing the image. Choose a setting that keeps the photo clear and sharp. Avoid very low quality settings. After resizing look at the main details and edges. Make sure the image still looks clean and professional.
Start the process : Once you have selected the image size and quality settings click the Resize or Upscale button. The AI tool will start processing your image. Wait for the process to finish. The tool will then show the resized image so you can check the final result.
Preview the result : Check the resized image before saving it. Compare it with the original photo if possible. Look at the details and edges to see if they still look clear. Make sure the image size is correct and the photo looks natural. If you are happy with the result you can save it.
Download the image : If the final image looks clear and the size is correct click the Download button. Choose the file format and quality if the tool gives you these options. Save the image to your computer. Open the downloaded file once to make sure it looks the same as the preview.
Common Image Resizing and Compression Mistakes
Resizing a photo is simple. But you can lose image quality if you use the wrong settings. A photo may look stretched or blurry after resizing. The wrong dimensions can also make it look poor on a website. Too much compression can remove small details. Using a low-quality original can make the final image even worse. Knowing these common mistakes helps you keep your photos clear and sharp.
- Stretching the Image
- Using the Wrong Dimensions
- Starting With a Low-Quality Image
- Compressing the Image Too Much
- Ignoring the Aspect Ratio
- Confusing Resizing With Compression
FAQ
Can I resize an image without losing quality?
Yes. You can resize an image and keep it clear with the right settings. Start with a high-quality original image. Keep the aspect ratio locked so the photo does not look stretched. Choose the right dimensions for your use. Avoid making a small image much larger than its original size. Always check the final image before saving it.
What is the best way to resize an image?
Photoshop is a good choice when you want more control over image size and quality. AI tools are useful when you need to enlarge a small image. Online tools work well for quick resizing. The best method depends on your image and the size you need.
How do I resize an image in Photoshop without losing quality?
Open your image in Photoshop. Go to Image > Image Size. Enter the width or height you need. Keep the aspect ratio locked. Choose a suitable resampling option. Check the image preview before saving it.
What Photoshop settings should I use when resizing an image?
Open Image > Image Size and enter your required dimensions. Keep the aspect ratio locked. Make sure Resample is selected when changing the pixel size. Choose a suitable resampling option. Preview the image before you save it.
Can Photoshop enlarge an image without making it blurry?
Yes. Photoshop can enlarge an image while keeping it clear. But making a very small image much larger can cause blur or pixelation. Use a suitable resampling option and check the result after resizing. Avoid increasing the image size too much.
Can AI tools resize images without losing quality?
AI tools can resize images while keeping them clear and sharp. They are especially useful when you need to make a small image larger. Upload your image. Choose the resize or upscale option. Select the size you need and check the result before downloading.
Is AI better than Photoshop for enlarging images?
Both tools have different strengths. Photoshop gives you more control over image size and quality. AI tools can be helpful when you need to enlarge a small image. Choose Photoshop for precise resizing. Choose AI when you need help keeping more detail in a larger image.
When should I use an AI tool instead of Photoshop to resize an image?
Use an AI tool when you need to enlarge a small image or keep more detail after enlargement. Photoshop is better when you need exact dimensions and more control over the resizing settings. Your choice should depend on the image and the final size you need.
Can AI improve the quality of a low-resolution image?
AI can make a low-resolution image look clearer when you enlarge it. It can add detail and improve soft areas. But AI cannot bring back every detail from the original photo. Start with the best image you have for better results.
What happens if I enlarge an image too much?
The image can become blurry or pixelated. Small details may also become less clear. This happens because the original image does not have enough pixels for the larger size. If you need a large image from a small photo then an AI tool may give you a better result.
Does image compression reduce image quality?
Yes. Too much compression can reduce image quality. It can remove fine details and make the image look less clear. Choose a suitable quality setting when compressing your image. Always check the final result before using it on your website or social media.
What is the difference between image resizing and compression?
Image resizing changes the width and height of a photo. Compression reduces the file size of the photo. For example you can resize an image from 3000 × 2000 pixels to 1200 × 800 pixels. Compression can then make that file smaller for website use.
Why does my resized image look blurry?
Your image may look blurry if you make it much larger than the original. A low-quality source image can also cause this problem. Check the image after resizing. Look at the details and edges. If needed try a suitable Photoshop setting or an AI resizing tool.
Why does my resized image look pixelated?
Pixelation often happens when a small image is enlarged too much. The original photo does not have enough pixels for the new size. Try using a better-quality original image. You can also use an AI tool when you need to enlarge a small photo.
Does changing image dimensions affect resolution?
Yes. Changing the pixel dimensions changes the amount of detail in the image. For example reducing a 4000 × 3000 pixel image to 1200 × 900 pixels means the image has fewer pixels. This is why choosing the right size before resizing is important.
How can I resize an image without stretching it?
Keep the aspect ratio locked when changing the image size. Enter the width or height you need and let Photoshop or your resizing tool adjust the other dimension. This keeps the original shape of the photo and prevents it from looking stretched or squeezed.
What image size is best for a website?
There is no single size that works for every website. Choose dimensions that fit the area where the image will appear. A large image does not need to be uploaded if the website displays it at a smaller size. Use the required dimensions and keep the image clear.
Can I resize an image without losing quality?
Yes. Start with a high-quality original image. Open it in Photoshop or use an AI resizing tool. Keep the aspect ratio locked. Choose the right dimensions for your use. Then check the final image to make sure it still looks clear and sharp.
What is the best way to resize an image?
Photoshop is a good choice when you need precise control over image size and quality. AI tools are useful for enlarging small images. Online tools can work well for quick resizing. Choose the method based on your image and the final size you need.
Conclusion
Use Photoshop when you need more control over image size and quality. Use AI tools when you need to enlarge a small image. Always keep the aspect ratio locked and choose the right dimensions. Avoid too much compression because it can affect image details. Start with a high-quality original image and check the final result before saving it. These simple steps can help you resize images while keeping them clear and sharp. You can use these methods for websites. Ecommerce pages. Social media. And other digital uses.