
Photography is a creative skill that anyone can enjoy. You do not need expensive gear to take better photos. Small changes can make a big difference. Simple photography hacks can help you use your camera in a smarter way. They can also help you find new ideas around you. You can use natural light and simple objects to create better photos. You can try new angles and different compositions. You can also improve your photos with basic editing. These tricks are useful for beginners and casual photographers. They can make photography more fun and less stressful. In this guide you will learn useful photography hacks that are easy to try. You can use many of them with a camera or a smartphone. Start with simple ideas and practice often.
Clean Your Lens Before Every Shoot
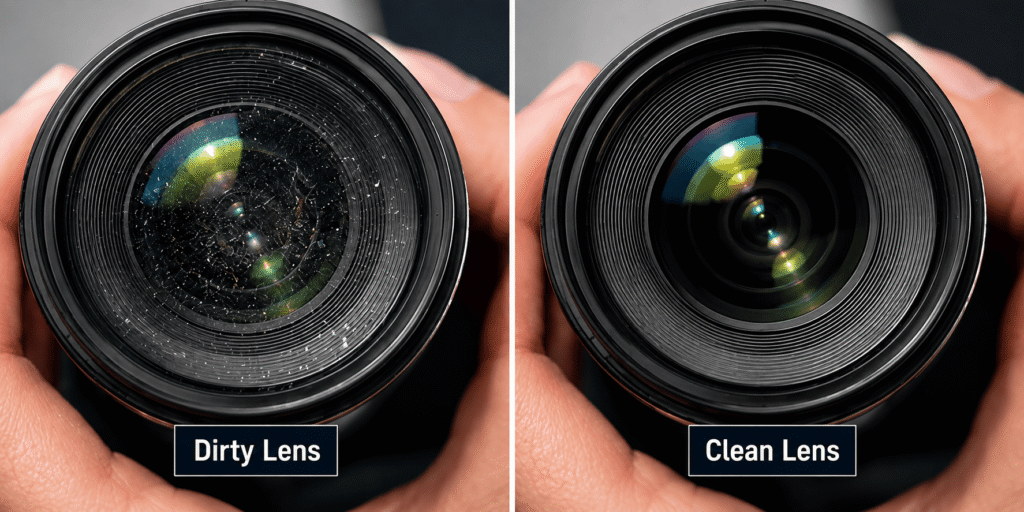
A clean lens can make your photos look much clearer. Dust and fingerprints can affect image quality. They can create small spots on your photos. They can also make the image look soft. Check your lens before every shoot. Use a soft microfiber cloth to clean the glass. Wipe the lens gently with light pressure. Do not touch the glass with your fingers. Check the lens after outdoor shoots. Dust can collect quickly in open areas. Clean your smartphone camera lens too. This is useful for close-up photos and portraits. A clean lens can help you capture sharp details. It can also reduce small problems during photo editing. This simple habit can improve your photography without extra equipment.
Turn On the Grid for Better Composition
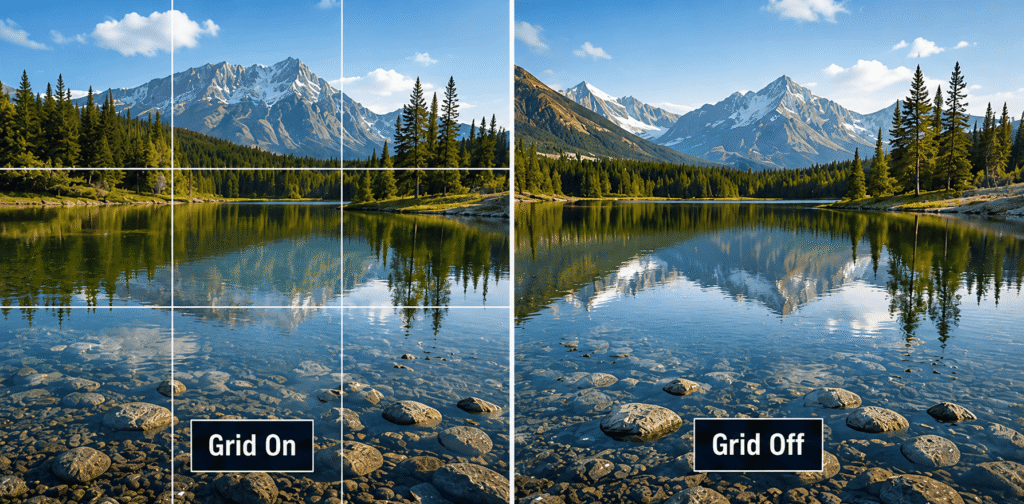
The grid can help you create better photo compositions. Most cameras and smartphones have a grid option. Turn it on before you start shooting. The lines can help you place your subject in a better position. They can also help you keep the horizon straight. Try placing the main subject near one of the grid lines. You can use the center area when you want a balanced photo. The grid is also useful for architecture and landscape photos. It can help you check the spacing between objects. Use the grid often when you practice. Over time you will understand composition more easily.
- Place the subject near a grid line
- Keep the horizon straight
- Check the spacing between objects
- Use the grid for landscape photos
- Try different subject positions
- Use it for architecture shots
Use Burst Mode to Capture Moving Subjects
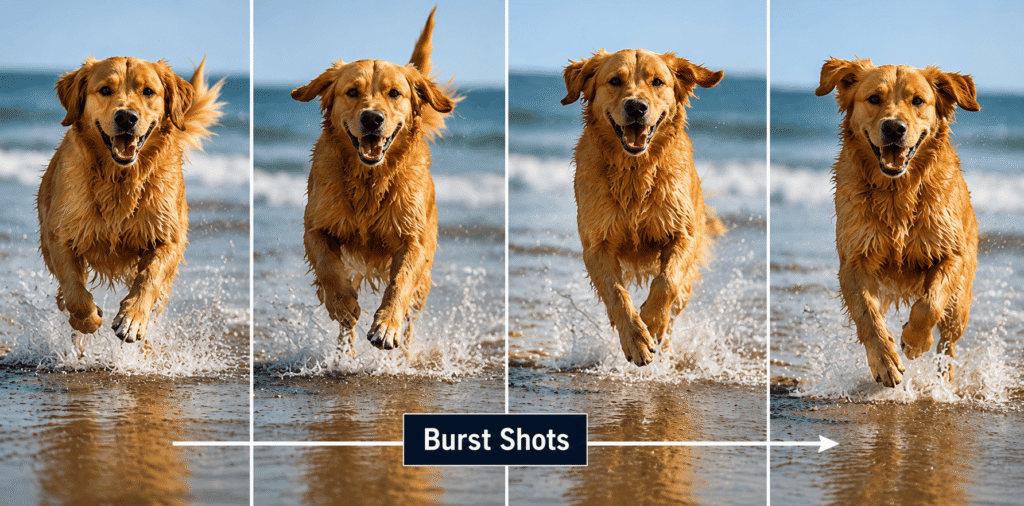
Burst mode lets you take several photos in quick succession. It is useful when your subject moves fast. You can use it for sports and pets. It also works well for children and action scenes. Start burst mode before the main moment. Keep your subject inside the frame as it moves. Hold the shutter button when needed. Review the photos after the shoot. Choose the frame with the best focus and pose. Make sure your camera has enough storage space. A fast memory card can also help. Use burst mode when timing is important. It can help you capture moments that are hard to repeat.
- Use burst mode for fast movement
- Keep the subject inside the frame
- Start shooting before the key moment
- Check focus before shooting
- Use a fast shutter speed
- Review all frames after the shoot
Lock Exposure Before Taking the Shot
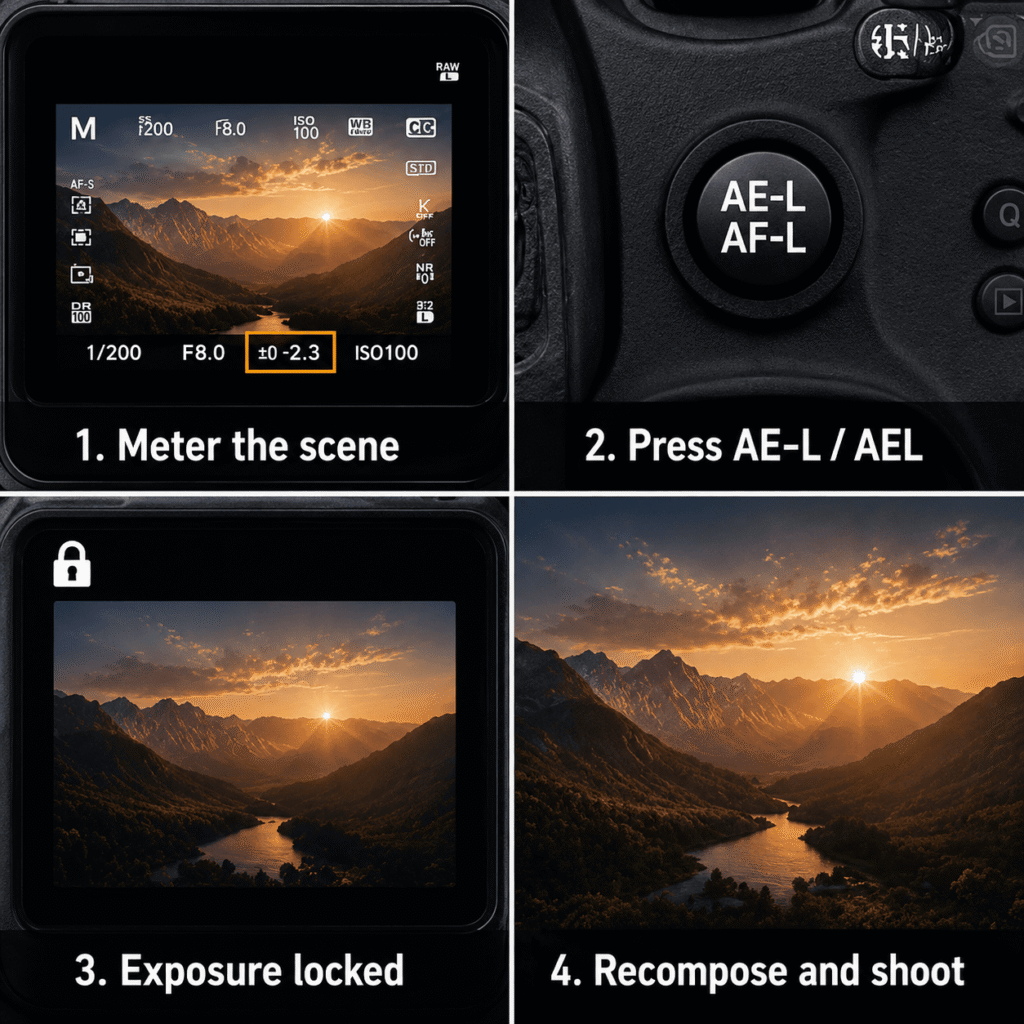
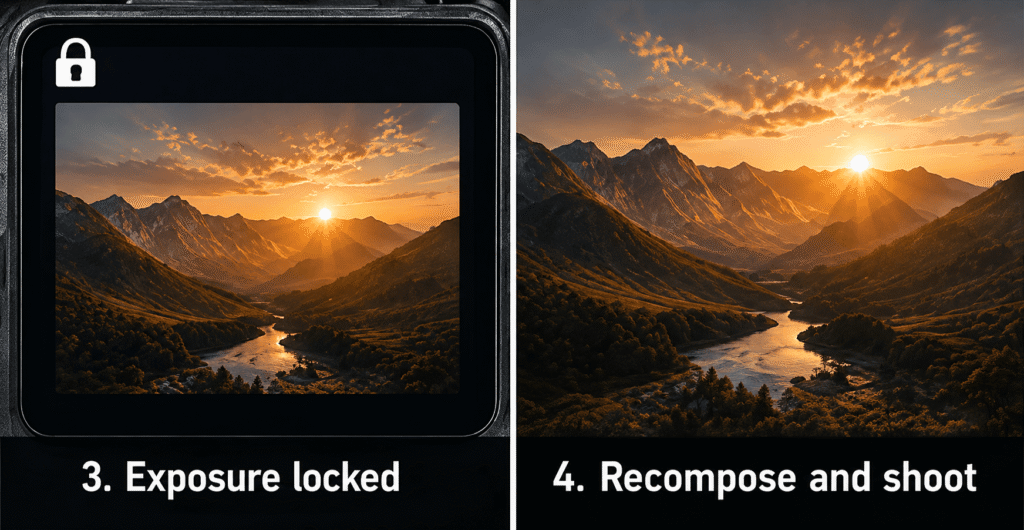
Exposure controls how bright or dark your photo looks. Your camera can change exposure when you move the frame. This can make the subject too bright or too dark. Exposure lock helps keep the brightness steady. Point your camera at the area you want to use for exposure. Lock the exposure before taking the photo. This works well when your subject is near a bright window. It is also useful for outdoor portraits. Check the photo after shooting. Adjust the exposure if needed. This simple feature gives you more control over lighting. It can also help you get more consistent results.
- Check the light before shooting
- Lock exposure on your main subject
- Use exposure lock near bright windows
- Check highlights after taking the photo
- Adjust exposure when the light changes
- Practice exposure lock on your smartphone
Move Closer Instead of Using Digital Zoom
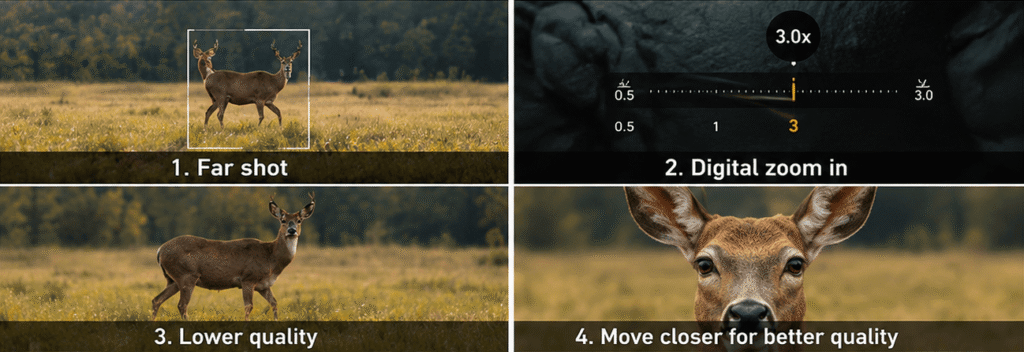
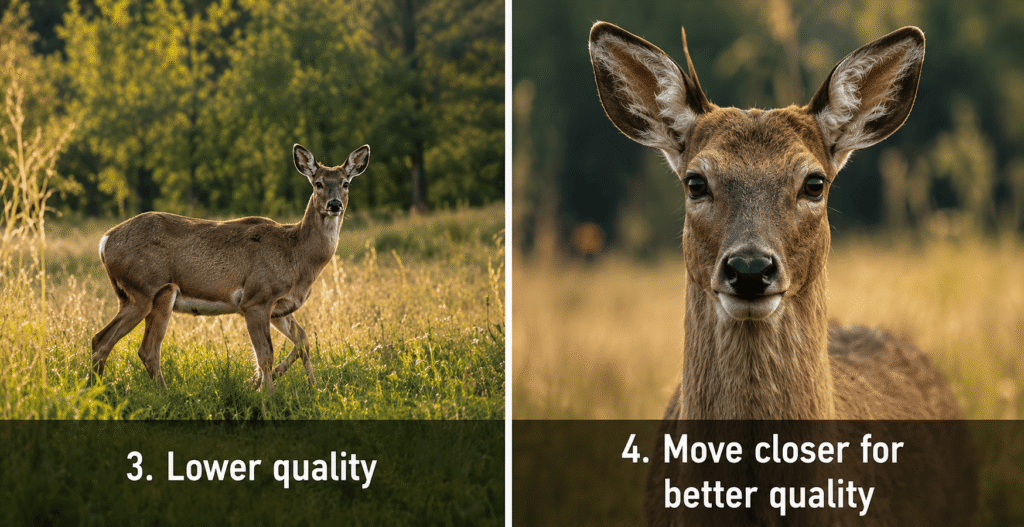
Digital zoom can make your photos look less clear. It enlarges the image instead of adding real detail. Moving closer can give you a sharper result. It can also help you capture more natural details. Try to move closer when it is safe to do so. Keep your subject inside the frame. Avoid getting too close for portraits. A little distance can give a better look. You can also use optical zoom when your camera has it. Check the photo before taking more shots. Moving closer can remove some background distractions. It can also make your subject more noticeable. This simple hack can help you get better photos without changing your camera gear.
Use a White Wall as a Natural Reflector
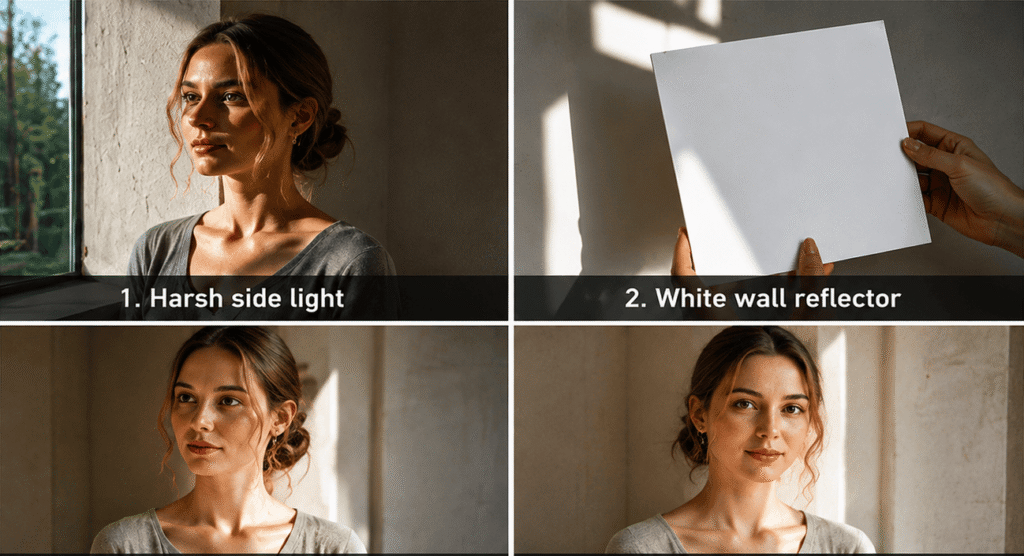
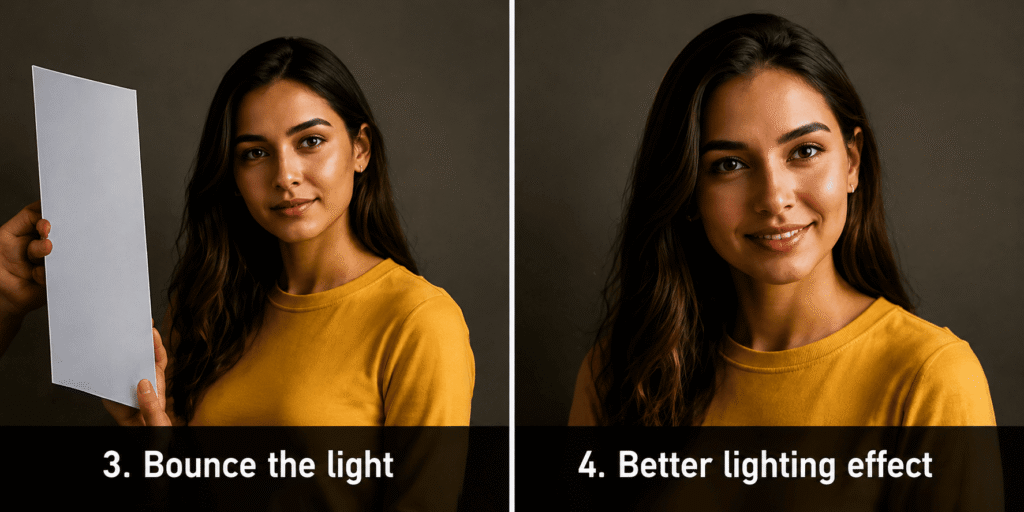
A white wall can work as a simple natural reflector. It can bounce light toward your subject. This can make dark areas look brighter. Place your subject near a white wall. Keep the light source on the other side. Window light works very well for this trick. The wall can reflect soft light onto your subject. This can reduce harsh shadows on the face. It is useful for portraits and product photos. Try moving your subject closer to the wall. Check the light after each small move. You do not need special equipment for this method. A plain white wall can help you create softer light with very little effort.
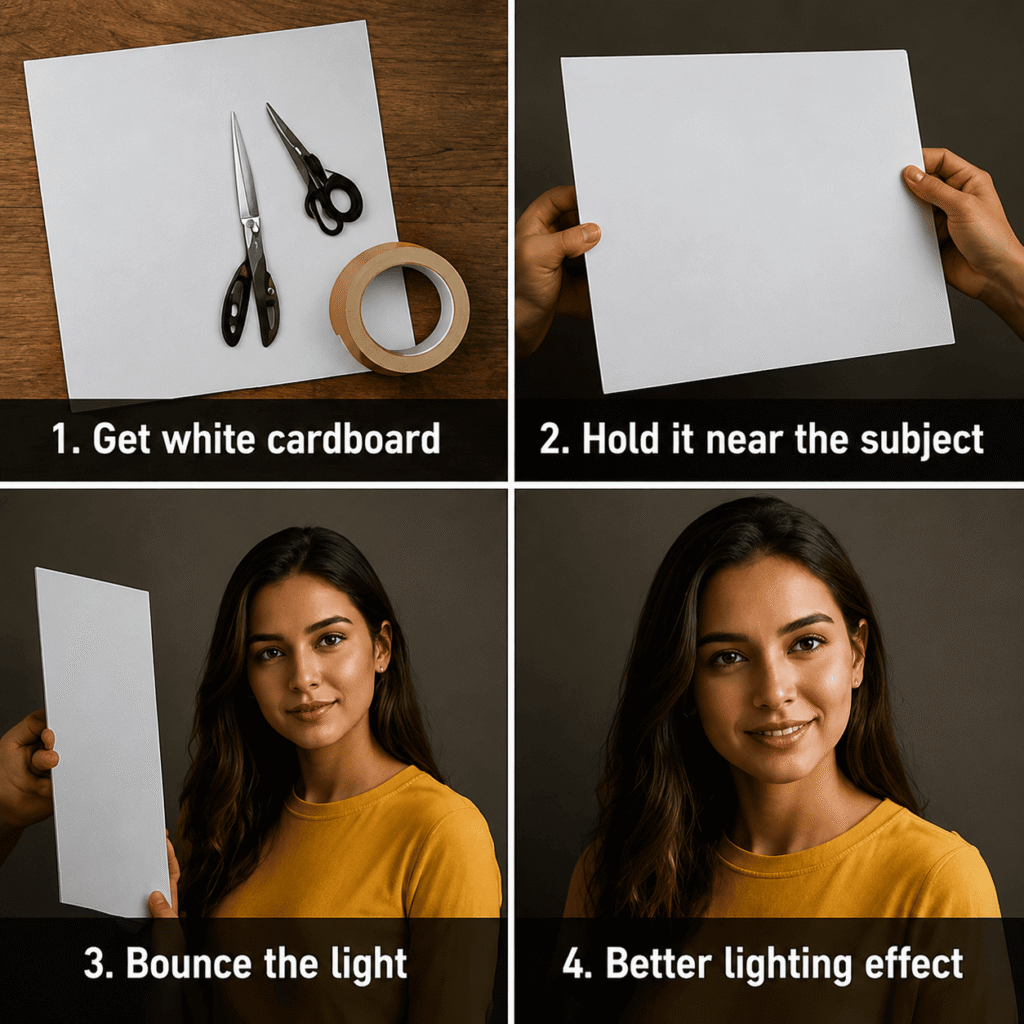
Make a DIY Reflector From White Cardboard
White cardboard can work as a simple reflector for photography. It can bounce light back toward your subject. This helps brighten dark areas in your photo. Place the cardboard near the shadow side of your subject. Move it closer for stronger light. Move it farther away for softer light. This trick works well for portraits and product photos. You can use a large piece for bigger subjects. A smaller piece works well for close-up shots. Keep the cardboard clean for better results. You can also fold it slightly to change the direction of the light. This simple setup can help you control light without buying extra gear.
- Use clean white cardboard
- Place it near the shadow side
- Move it closer for stronger light
- Move it farther away for softer light
- Adjust the angle to control the light
- Use a larger piece for bigger subjects
Use a Curtain to Soften Harsh Window Light
Strong window light can create hard shadows in your photos. A thin curtain can make this light softer. It works like a simple diffuser. Place your subject near the window. Close the curtain when the sunlight looks too strong. White curtains can spread the light more evenly. This can create a soft look on faces and products. You can also adjust the curtain to control the light level. Try moving your subject closer to the window. Check the shadows before taking the photo. This method works well for indoor portraits and product photos. It is simple and costs nothing if you already have a curtain. It can help you create better indoor light without extra equipment.
Create Interesting Shadows With Household Objects
Household objects can help you create creative shadow effects. You can use leaves or plants to make natural patterns. You can also use blinds or small objects with simple shapes. Place the object between the light and your subject. Move it closer to change the shadow size. Move it farther away for a softer effect. Strong light can create clear shadow shapes. Soft light can create gentle patterns. Try this trick with portraits or still life photos. Check your subject before taking the shot. Make sure the shadow does not cover important details. This simple hack can turn normal indoor light into a creative photography setup.
- Use objects with interesting shapes
- Place the object between the light and subject
- Move the object to change the shadow
- Try plants and leaves
- Use strong light for clear patterns
- Keep important details visible
Shoot Through Glass for a Creative Effect
Shooting through glass can give your photos a unique look. It can create soft reflections and add more depth to the frame. Windows can work well for portraits and street photos. Clean the glass before shooting for a clearer image. Try different camera angles to find interesting reflections. Keep your main subject in focus. You can also use textured glass for a softer effect. Avoid strong glare when possible. Move your camera slightly until the reflection looks right. This technique works well for creative portraits and city scenes. It can also help you create layered photos. Try different glass surfaces around you. Small changes in position can create very different results.
Use Reflections to Add Visual Impact
Reflections can make simple photos look more creative. You can find reflections on water and glass. Mirrors and shiny surfaces can also work well. Look for puddles after rain. Try a low angle to include the reflection in the frame. You can also use windows for city photos. Move around your subject to find the best reflection. Keep your camera steady when taking the shot. Try to show both the subject and its reflection. Reflections can create balance and symmetry. They work well for landscapes and street photos. Look around carefully before shooting. You may find interesting reflections in places you normally ignore.
- Look for reflections in water
- Try puddles after rain
- Use mirrors and glass surfaces
- Try a low camera angle
- Move around to find the best reflection
- Keep the camera steady
- Check for unwanted objects in the reflection
Add a Foreground Object for More Depth
A foreground object can make your photos look deeper. It adds another layer to the frame. You can use leaves or flowers as foreground objects. You can also use doors and windows. Place the object close to your camera. Keep your main subject farther away. Use a wide aperture if you want a soft foreground. Make sure the object does not cover important parts of your subject. Try moving your camera to find a better position. This trick works well for portraits and landscapes. It can also make simple scenes look more interesting. Look around your location for useful objects. Small details near the camera can create a stronger sense of depth.
Shoot From a Low Angle for a Fresh Perspective
Shooting from a low angle can give your photos a fresh look. It changes how the viewer sees the subject. Get closer to the ground before taking the photo. Point your camera slightly upward when needed. This can make buildings and trees look taller. It can also make small subjects stand out. Try this method with flowers and pets. Check the background before you take the shot. The sky can create a clean background. Move around to find the best angle. A small change in your camera position can make an ordinary photo look more creative. This hack is easy to try with any camera or smartphone.
Try a High Angle for Better Overhead Photos
A high angle can give your photos a fresh view. It lets you show more of the scene. This works well for food and product photography. It is also useful for flat lay photos. Hold your camera above the subject and check the frame. Keep the camera level when you want a clean overhead look. Check the edges of the frame for unwanted objects. Try different heights to find the best view. You can also change the position of your subject. Natural light can make overhead photos look bright and clear. A high angle can make simple scenes look neat and organized. It is an easy way to try a new composition.
Use Leading Lines to Guide the Viewer’s Eye
Leading lines can guide the viewer toward the main subject. They can also make a photo look deeper. Roads and paths are common examples. You can also use walls and fences. Stairs and bridges can create strong lines too. Look around your scene before taking the photo. Find lines that point toward your subject. Change your position to make the lines clearer. Try placing your subject near the end of a line. This technique works well for landscapes and street photos. It can also improve architecture photos. Simple objects around you can create useful lines. Use them to make your composition more clear and balanced.
- Look for roads and paths
- Use walls and fences
- Try stairs and bridges
- Place your subject near the line
- Change your camera position
- Keep the lines clear in the frame
- Use lines to add depth
- Avoid distracting lines in the background
Turn Ordinary Walls Into Simple Backgrounds
An ordinary wall can become a clean photo background. You do not need a studio for every shoot. Look for walls with simple colors or light textures. Place your subject in front of the wall. Leave some space between the subject and the wall. This can help reduce strong shadows. You can also use a wide aperture for a softer background. Check the wall for marks or unwanted objects. Try different camera angles to change the look. Plain walls work well for portraits and product photos. Textured walls can add more character. Look around your home or street. You may find many simple backgrounds that can improve your photos.
Use Your Laptop Screen as a Creative Background
Your laptop screen can work as a simple creative background. You can display a photo or color on the screen. Place a small subject in front of it. Adjust the screen brightness to control the background. Keep the subject close to the screen when needed. Use a wide aperture to create a soft background. Check for screen glare before taking the photo. Try different images to create new looks. This hack works well for small products and objects. It is also useful for creative still life photos. You can change the screen image whenever you want. This gives you many background options without buying extra equipment.
- Choose a simple screen image
- Adjust the screen brightness
- Keep the subject in focus
- Check for unwanted glare
- Try different background colors
- Use a wide aperture for soft blur
- Keep the subject properly positioned
- Try different screen images for new looks
Create Soft Light With a Simple Diffuser
A diffuser can make strong light look softer. It spreads the light across your subject. This can reduce hard shadows and bright highlights. You can use a thin white curtain or white fabric as a simple diffuser. Place it between the light source and your subject. Window light works well with this method. Move the diffuser closer when the light feels too strong. You can move it farther away for a different effect. This hack works well for portraits and product photos. It can also help create smooth indoor lighting. A simple diffuser can improve your photos without expensive studio equipment.
- Use thin white fabric
- Place it between the light and subject
- Use it with strong window light
- Move it closer for softer light
- Check the shadows on your subject
- Avoid very dark fabric
- Keep the diffuser stable
- Test the light before shooting
Use a Plastic Bag for a Creative Lens Effect
A clear plastic bag can create a soft photo effect. It can add a gentle blur around the edges. This can make portraits look more creative. Place the bag around the front of the lens. Keep the center of the lens clear. This lets you keep the main subject sharp. Move the bag slightly to change the effect. You can also try a colored bag for a different look. Use a clean bag for better results. Do not cover the lens completely. Make sure the bag does not block your view. Try this hack with portraits and creative scenes. Small changes can create different effects.
- Use a clear plastic bag
- Keep the center of the lens clear
- Cover only part of the frame
- Move the bag to change the effect
- Try different bag positions
- Use a clean bag
- Keep the subject in focus
- Avoid covering the full lens
Create Color Effects With Transparent Materials
Transparent materials can add creative color to your photos. You can use colored plastic or clear sheets. Place the material near the edge of your lens. Keep the main subject clear and sharp. Move the material around the frame to change the effect. You can try different colors to match your subject. Natural light can make the colors look soft. This trick works well for portraits and still life photos. You can also use colored glass for stronger effects. Check your focus before taking the photo. Try several positions and colors. Small changes can create different results. This is a simple way to make your photos more creative.
- Use clean transparent materials
- Try different colors
- Keep the main subject clear
- Place the material near the lens edge
- Move it to change the color effect
- Use natural light
- Try colored glass
- Check focus before shooting
Use a Mirror for Creative Portraits
A mirror can help you create unique portrait photos. It can show the subject and the surrounding space in one frame. Place the mirror in a good position before shooting. Check the background for unwanted objects. Try a full body reflection or a close-up view. Move the mirror to find a better angle. Window light can make the reflection look soft and clear. Clean the mirror before taking photos. You can also use a small mirror for a creative composition. Try different positions and camera angles. This simple trick can make a normal portrait look more interesting. It also gives you more ways to experiment with composition.
- Clean the mirror before shooting
- Check the background
- Try different mirror angles
- Use natural window light
- Try full body reflections
- Try close-up reflections
- Move the camera for new views
- Keep the main subject clear
Use a Self-Timer for Sharper Self-Portraits
A self-timer can make self-portraits easier to take. It gives you time to move into position before the photo is taken. Place your camera on a stable surface or tripod. Choose a short timer such as five or ten seconds. Check the frame before starting the timer. Focus on the spot where you plan to stand. Use natural light when possible. Take several photos with different poses. The self-timer also reduces camera shake from pressing the shutter button. It works well with cameras and smartphones. This simple feature is useful when you are shooting alone. It can help you take sharper and better planned self-portraits.
- Use a stable surface
- Choose a five or ten second timer
- Check the frame first
- Set focus before shooting
- Use natural light when possible
- Try different poses
- Take several photos
- Keep the camera steady
Make a Simple DIY Tripod From Everyday Objects
You do not always need a tripod for stable photos. Everyday objects can help support your camera. A stack of books can create a simple camera stand. A table or shelf can also work well. Place your camera on a flat and stable surface. Make sure it cannot slide or fall. Use the self-timer to avoid camera shake. This trick works well for still life photos and self-portraits. It can also help with low light photography. Check your frame before taking the photo. Keep your camera secure at all times. A simple DIY setup can help you take steady photos when you do not have a tripod.
- Use a flat surface
- Stack books for extra height
- Make sure the camera is stable
- Use a self-timer
- Check the frame before shooting
- Keep the camera away from edges
- Avoid unstable objects
- Use this setup for still life photos
Use Motion Blur to Show Movement
Motion blur can make your photos show a sense of movement. It happens when the subject moves while the shutter stays open. This effect works well for cars and cyclists. It can also work for flowing water and moving people. Use a slower shutter speed to create more blur. Keep your camera steady when needed. Try tracking the subject with your camera for a stronger effect. Check your photos after each shot. Adjust the shutter speed if the blur is too strong. This technique can make action photos look more dynamic. It also helps tell the story of movement in a creative way.
- Use a slower shutter speed
- Keep the camera steady
- Try panning with the subject
- Photograph moving cars or cyclists
- Try flowing water
- Check the amount of blur
- Adjust the shutter speed when needed
- Take several shots for better results
Shoot During Golden Hour for Better Natural Light
Golden hour gives you soft and warm natural light. It happens shortly after sunrise and before sunset. The light is less harsh at this time. This can help create softer shadows on your subject. It also gives photos a warm and pleasant look. Golden hour works well for portraits and landscapes. Try placing your subject where the light falls gently. You can also shoot toward the sun for a soft glow. Check your exposure before taking the photo. Move around to find the best light. Golden hour does not last long. Plan your shoot before the light changes. This simple photography hack can make your photos look more natural and attractive
Change Your Shooting Position Before Changing Gear
You do not always need new gear to get a better photo. A small change in your shooting position can create a big difference. Move closer to your subject when needed. Step back when you want more space. Try shooting from the side or from a lower position. You can also move higher to change the view. Check the background after each move. A different position can improve the light and composition. It can also remove unwanted objects from the frame. Take a few test shots before changing your lens. This simple habit can help you use your current gear better. It also makes photography more creative and enjoyable.
Take Several Angles Before Choosing Your Best Shot
Taking photos from several angles can help you find a better view. Do not choose the first angle too quickly. Move around your subject and take a few test shots. Try a front view and a side view. You can also try a low angle or a high angle. Check how the light changes with each position. Look at the background too. A small move can remove unwanted objects from the frame. This method works well for portraits and product photos. It also helps you understand which angle suits your subject. Compare your photos after the shoot. Then choose the shot with the best light and composition.
Shoot in RAW for More Editing Flexibility
RAW files keep more image data than JPEG files. This gives you more control when editing your photos. You can adjust exposure and white balance more easily. RAW files can also help you recover some bright and dark details. This format is useful for photographers who edit their photos later. RAW files take more storage space than JPEG files. You also need editing software that supports RAW files. Check your camera settings before shooting. Use RAW when you want more control over the final image. It is especially useful for portraits and difficult lighting. Always keep enough storage space for your RAW files.
- Use RAW when you plan to edit
- Check your camera file settings
- Keep enough storage space
- Adjust exposure carefully when editing
- Correct white balance when needed
- Save an edited copy separately
- Keep the original RAW file
- Use software that supports RAW files
Fix Small Photo Problems With Simple Editing
Simple editing can fix small problems in your photos. You can adjust brightness and contrast to improve the image. You can also correct the white balance when colors look wrong. Cropping can remove unwanted parts from the frame. Small dust spots can be removed with a basic healing tool. Keep your edits natural and clean. Avoid making the colors too strong. Do not add too much sharpening. Check the original photo before saving your final version. Simple editing works well for portraits and product photos. It can improve your photos without changing their natural look. Use basic tools first and make small changes.
- Adjust brightness when needed
- Correct the white balance
- Crop unwanted areas
- Remove small dust spots
- Make small changes
- Keep skin tones natural
- Avoid heavy filters
- Do not over sharpen
- Compare the edited photo with the original
- Save the original photo before editing
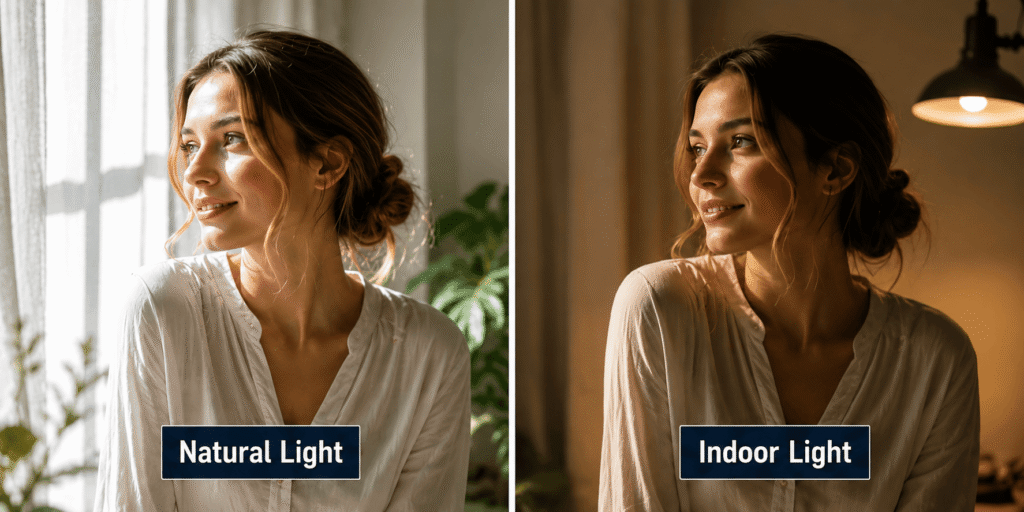
Use Window Light for Soft Indoor Photos
Window light can give your indoor photos a soft and natural look. It is easy to use and does not need expensive equipment. Place your subject near a window and check the direction of the light. Side light can add gentle shadows to portraits. Front light can create a bright and even look. Avoid strong direct sunlight when it creates harsh shadows. A thin curtain can make the light softer. Move your subject closer or farther from the window to change the light. Check the background before shooting. This method works well for portraits and product photos. Try different positions to find the best light. Window light can make simple indoor photos look clean and natural.
Common Photography Mistakes to Avoid
Good photography is not only about using the right camera settings. You also need to avoid simple mistakes. Small errors can affect the quality of your photos. A dirty lens can make images look soft. A crooked horizon can make a photo look unbalanced. Wrong exposure can remove important details. A busy background can distract from your subject. Poor focus can make the main subject look unclear. Camera shake can reduce sharpness. Too much editing can make photos look unnatural. Ignoring natural light can also limit your results. Learn these common mistakes and check your photos before finishing each shoot. This simple habit can help you create cleaner and better photos.
- Dirty Lens
- Crooked Horizon
- Overexposed Photos
- Busy Background
- Wrong Focus
- Camera Shake
- Too Much Editing
- Ignoring Natural Light
FAQ
What are the best photography hacks for beginners?
Start with simple hacks such as cleaning your lens and using the grid. Try natural light and different camera angles. These tricks can improve your photos without complex settings.
How can I take better photos without expensive equipment?
Use natural light and simple backgrounds. Try a white wall as a reflector. You can also use household objects to create creative effects.
What is the easiest photography hack for better lighting?
Use window light. Place your subject near a window. Move the subject until you find soft and even light.
How can I make indoor photos look more professional?
Use soft window light and keep the background simple. A curtain can also soften strong light. Keep your camera steady for sharper photos.
How can I improve smartphone photography with simple hacks?
Clean your phone lens before shooting. Turn on the grid and use natural light. Avoid digital zoom when possible. Try different angles for better compositions.
What is the best photography hack for sharp photos?
Keep your lens clean and hold your camera steady. A tripod can help in low light. You can also use a self-timer to reduce camera shake.
How can I create better backgrounds for photos?
Look for plain walls and clean spaces. Remove distracting objects from the frame. You can also use a laptop screen or a simple foreground object.
How can I take creative photos using everyday objects?
Use mirrors and glass for reflections. Try cardboard as a reflector. You can also use plants and household objects to create shadows.
What photography hacks can improve portrait photos?
Use soft window light and focus on the eyes. Try different camera angles. A mirror can also create a unique portrait composition.
How can I take better photos in low light?
Keep your camera steady and use a tripod when possible. Open the aperture if your camera allows it. You can also use a slower shutter speed for static subjects.
How can I create professional-looking photos at home?
Use window light and a simple background. A white wall can reflect light onto your subject. Keep the setup clean and check your composition before shooting.
What are the best composition hacks for photography?
Use the rule of thirds and leading lines. Try different angles and add foreground objects. Keep the background simple to make your subject stand out.
How can I make ordinary photos look more creative?
Change your camera position and look for reflections. Try shadows and unusual angles. You can also use transparent materials to create simple color effects.
What photography hacks are useful for product photography?
Use soft window light and a clean background. Try a white wall as a reflector. Use a tripod for sharp photos. Shoot in RAW when you plan to edit.
Can photography hacks replace expensive camera equipment?
Photography hacks cannot replace every type of camera gear. They can help you get better results with the equipment you already have. Good light and composition often matter more than expensive gear.
Conclusion
Photography can become more fun when you try simple ideas. You do not need expensive gear to improve your photos. Small changes can create better results. Clean your lens before every shoot. Use natural light whenever possible. Try new angles and simple backgrounds. Use reflections and shadows to add more creativity. Everyday objects can also help you create unique effects. Keep your camera steady when you need sharp photos. Practice different composition techniques and review your results. Do not be afraid to try something new. Some photos may not look perfect at first. That is part of learning. Keep practicing and learn from each shot. With regular practice you can build confidence and improve your photography skills. Most importantly enjoy the process and keep exploring new photography ideas.