
Who doesn’t like swapping their friend’s face with something or someone else’s funny face right? I mean it makes them look very much hilarious but it also shows your love for them.
And if you’re new to Photoshop plus you’re learning some cool basic tips on how to use Photoshop? Then, without learning to swap faces your adventure in the world of Photoshop is incomplete.

To be honest, this is one of the coolest techniques ever. It is also quite useful. Most of the magazines, newspaper printers, Funny social pages, Funny social video covers, etc use these swapped photos of different celebrities and famous persons in order to grab audiences and humorous readers for them.
If you’re a freelancer and you can swap faces then don’t just sit back and waste your time, make use of this talent and grab such customers who need swapped photos for their magazine, news, pages or covers.
It can be sometimes useful for you too. Suppose you want to get a new hairstyle or beard style. But, you can’t exactly imagine yourself in that style, and then you can just simply swap those beard styles and hairstyles with your face plus you can also see by yourself that how you may look in that style. You may say “Aye! I look great”-if it suits you or may also say “Nah! I look like a weirdo”- if it doesn’t suit you.
You can use face swapping on Birthday cards, Facebook Timeline posts, Trolls, Memes and many other things that I can’t actually stop saying about. This phenomenon has become extremely famous worldwide.
So just a coffee! Sit back and scroll!
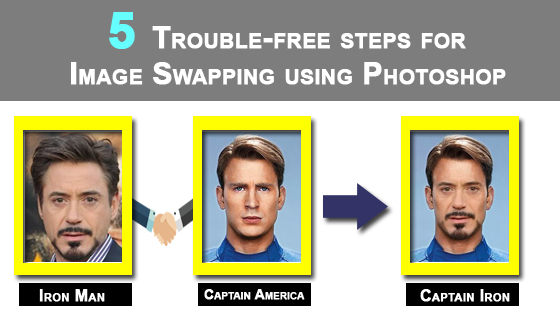
Note: As 2018 is the season of marvel movies, I am using the photos of Robert Downey Jr (aka Iron Man) and Chris Evans (aka Captain America) for swapping.
Steps for Photo Swapping –
Step 1:
The initial step is to open two photos in two different TABS on Photoshop. For, this you can just Drag a photo from your PC and drop it in the TABS section of Photoshop or you can Go to the File menu on the upper bar, then click the Open option on it (Ctrl+O) , then a new pop up option will come on the screen that will show your Hard Disk drives from where you can just choose the photos and open them in different TABS of Photoshop


Step 2:
Now after the first step, Your Photos should be open in two different TABS on Photoshop. It’s time to start clipping and selecting the area of the photo you want to use as the swapping element. Here, I am have clipped the face with beard of Iron man and copied the selected area so that I can paste it on the Tab where the photo of Captain America is. To do so, choose the Pen tool from the left side bar and use it for clipping the desired area from the photo. After clipping paths on the area, right click on the mouse and choose the Make Selection option from the appeared menu. After selecting this option a new pop-up menu will appear on the screen, click Ok on it and your area will be selected. Click (Ctrl+C) from keyboard to copy the selected area and to use it as an element for swapping.


Step 3:
After selecting the swapping element, it is time to paste it on the other picture whose face you want to swap. Here, I will be swapping the face of Captain America with the face of Iron Man as a Swapping element. But, to make the actual image of Captain America safe, I have copied the background layer. This way we can easily fix the accidents that may occur while editing. To copy the layer simply choose the background layer and right click on the mouse then choose the Copy Layer option from the appeared menu and your layer will be copied. Then open a new layer in the layer box by clicking on the Create layer option from the bottom bar on the layer box. After creating the new layer you have to paste the selected area of the element you had copied before. To do so, click on the new transparent layer and Click (Ctrl+V). Then your copied element will get pasted on the Tab.


Step 4:
In this step, we will adjust the element on the copied layer of the subject and we will remove the adjusted area from the background image. Here, the element is the copied layer of iron man’s face and the subject is captain America’s photo. To do this, at first select the layer of the element clicking (Ctrl+Layer) and then decrease its opacity to gently fit the photo or adjust it according to Captain America’s face structure.
Now after adjusting the layer, increase the opacity to 100%. Then Go to the Select menu from the Upper bar, then go to the Modify option on the menu and choose the Contract option from the slide-out menu. A new dialogue tab will show on the screen input 10 on the box and Click OK. Your Photo will get adjusted properly.
Then Click Backspace from your keyboard, but keep your main background Layer hidden. This way the adjusted layer will become transparent.


Step 5:
After contracting the image and making its background transparent. We have to blend the Layers to complete the Process of Image swapping. To do this, select both layer1 and background copy layer pressing the Shift button. Then Go to the Edit menu on the upper bar and select the Auto-blend Layers option from it. Then your layers will get blended and merged accordingly. Click the magic wand tool on any canvas of any layer and the swapping process will be complete.


conclusion
These were the steps that can easily help you to swap your desired photos and can use them for almost anything you want to. Other applications and tools can also be used for swapping but Photoshop is the best for such cause. I hope you have completely understood the process of swapping so far. These steps are actually very simple and uncomplicated.
Therefore, just open a Photoshop, take two photos and Swap!
